Introduction to Photoshop
Photoshop 101
Kick off the course by getting to know Photoshop’s interface.


Get ready to learn Photoshop in just 7 days!
Photoshop is probably the best-known digital design tool. Dating back to 1990 and available for both PC and Mac, it’s a versatile, fully-featured graphics editor that has helped many people unleash their creativity over the years.
Although it began life as a photo editing package, it has gradually evolved into a product that’s used by photographers, designers, and digital artists alike to create a whole range of work (including 3D graphics and animations!)
Why use Photoshop?
In recent years, nimble packages like Sketch and Figma have emerged to help digital designers work more quickly and efficiently.
However, there are still good reasons to learn Photoshop—not least that many design agencies and employers still use Photoshop as their go-to tool for web and UI design.
There’s also the clear advantage that Photoshop is a more fully-featured package than Sketch, and some teams simply need that power to work on complex or visually detailed projects.
What you will learn on the course
In Photoshop 101, you’ll:
- Learn a professional workflow that allows you to build layouts and edit photos non-destructively.
- Master core Photoshop skills including adjustment layers, smart filters, image masks, photo enhancements, and keyboard shortcuts.
- Create your own web layout and GIFs to share with friends or add to your portfolio!
We’d love to hear how you’re getting on! Share your work and questions over on Twitter with the hashtag #Photoshop101.
Day 1 learning objectives:
- Understand what Photoshop is and how it works
- Find your way around Photoshop’s interface
- Set up your Preferences
- Cover essential keyboard shortcuts
Time to complete: 30 minutes
First, get a copy of Photoshop
If you’re already set up with a copy of Photoshop, great! You can skip this section.
The great news is that you no longer have to buy a copy of Photoshop outright, like you did a few years ago. Instead, Adobe now makes all its products available on a subscription basis via Adobe Creative Cloud. You can get set up with a license from $9.99 a month.
Alternatively, you can try Photoshop on a free trial basis for 7 days, which will cover you for this course!
Opening Photoshop and setting up our preferences
Before we go any further, one caveat: all of the screenshots and keyboard shortcuts referenced in this course refer to the Mac version of Photoshop. At the end of today’s tutorial, you can download keyboard shortcut cheat sheets for both PC and Mac. If you’re learning on PC, we definitely recommend having this cheat sheet nearby—though the keyboard shortcuts are usually very similar!
First, let’s open up Photoshop. You should see a welcome screen something like this:

Before we go any further, we’re going to want to make a few changes to our Preferences. You can access these by hitting [[⌘]] [[K]]. This will bring up the following Preferences panel:
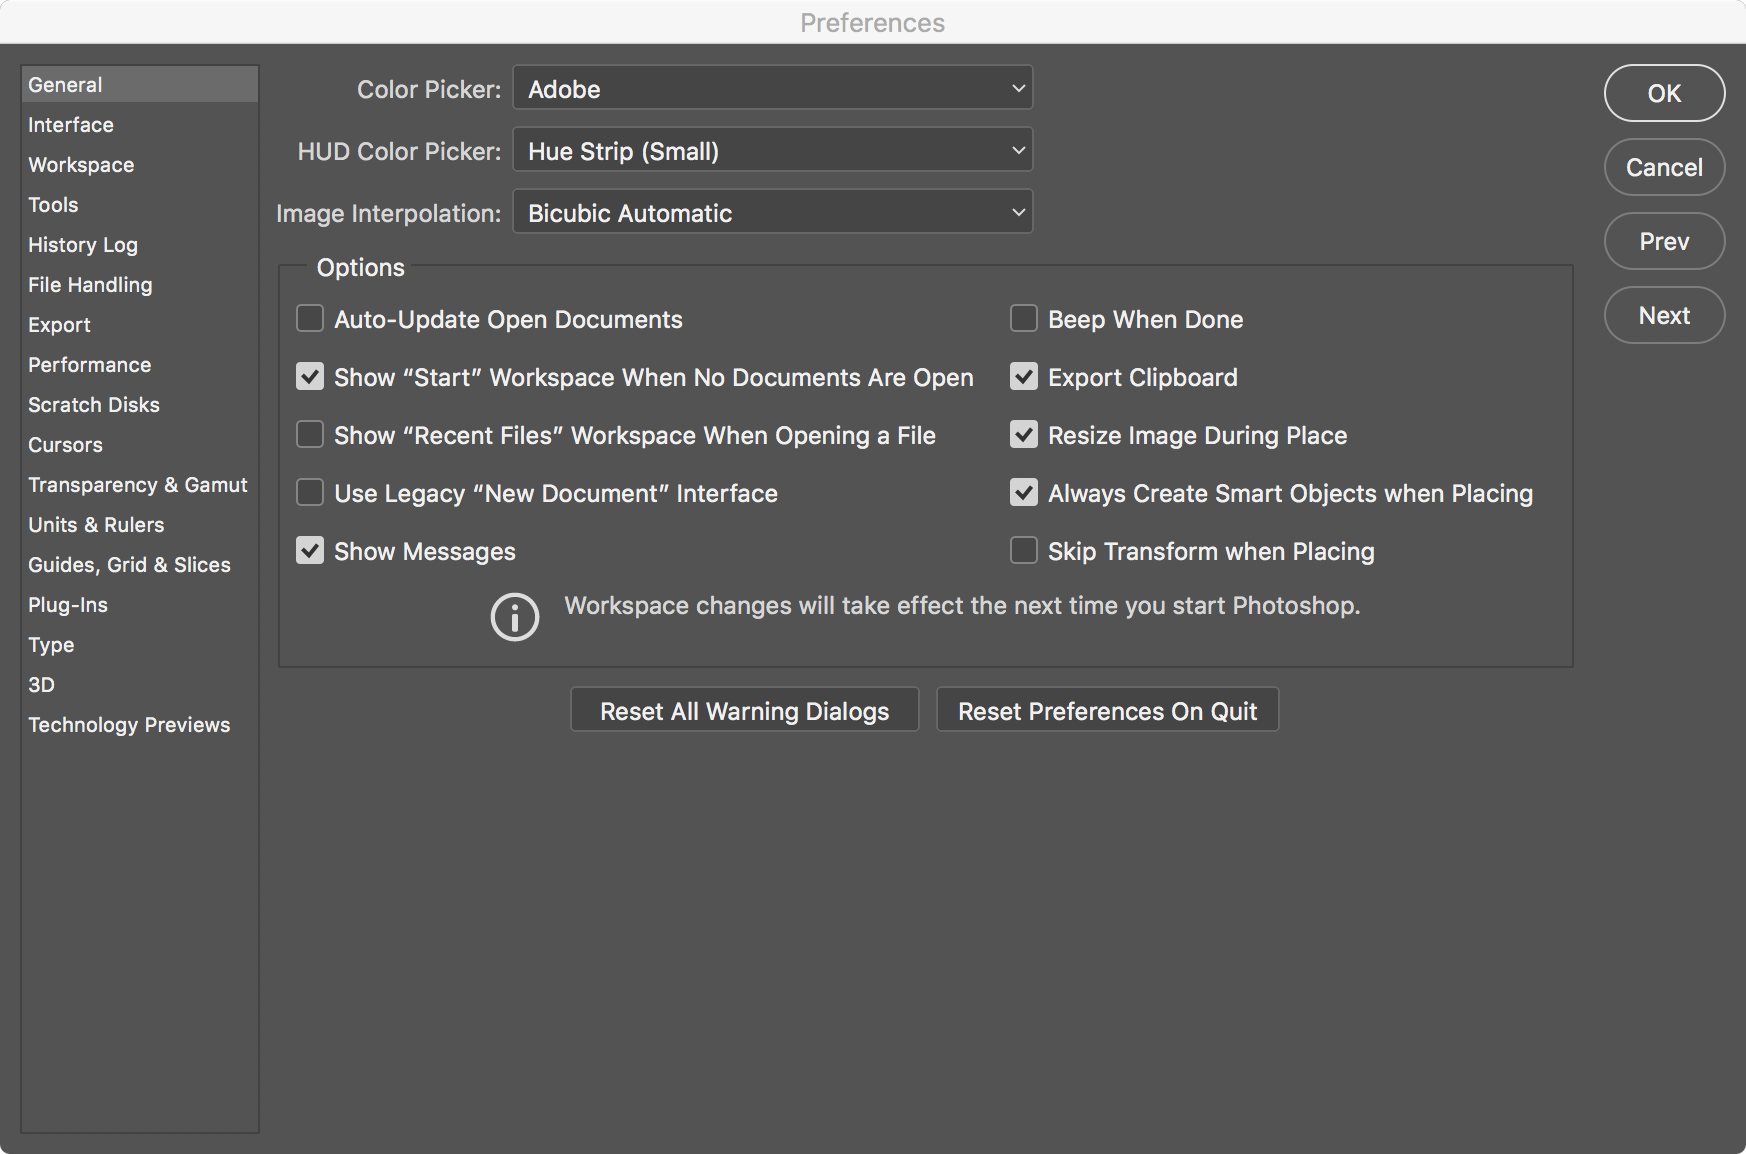
In the Interface section, we recommend switching the Color Theme setting to the fourth option (the lightest gray). The dark gray interface looks pretty cool, but we find it’s also quite tiring on the eyes!
Here are some other changes we recommend:
- In the Tools section, un-check Animated Zoom, and un-check Zoom Resizes Windows
- In the Units & Rulers section, change the units for Rulers and Type to be pixels. This is because we’ll be working on screen design (digital design) projects during this course, so we need to be working in pixels.
- In the Guides, Grid & Slices section, change the Grid settings to Gridline Every 32 Pixels, with 4 subdivisions.
Phew! That stuff might have seemed dull, but it’s worth spending a moment whenever we’ve got a fresh install of Photoshop to set things up as we need them. Imagine that you’ve been working in your own setup at home, and then you’re asked to start working on a machine in a studio that’s set up completely differently—you’re going to want to be able to control that environment, and the Preferences panel ([[⌘]] [[K]]) is the place to do it.
Creating a new document and setting up our panels
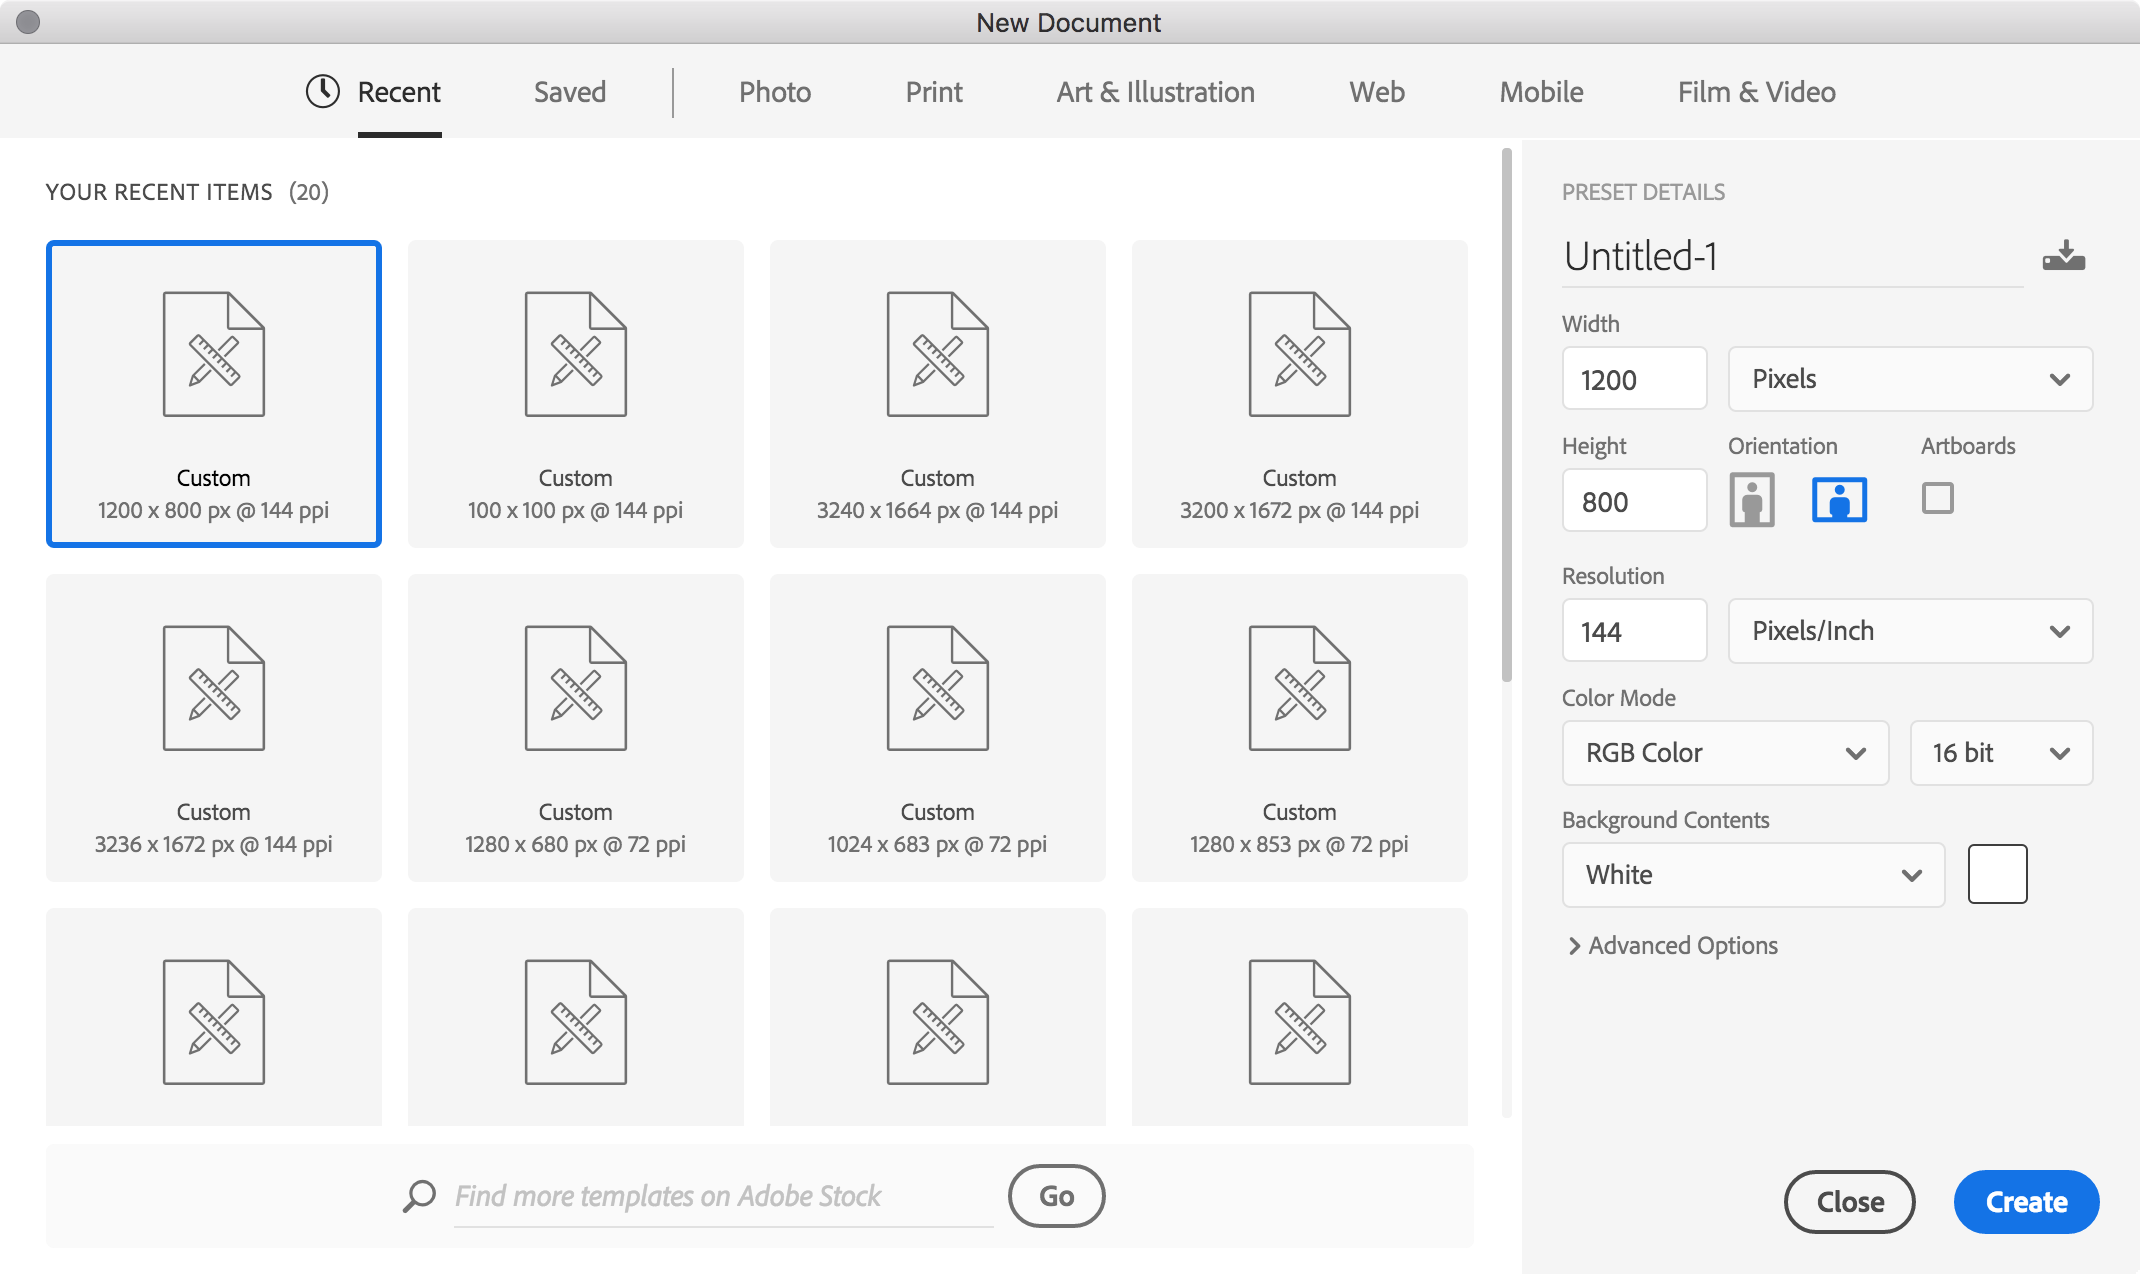
Click OK to close the Preferences panel. So that we can start exploring the interface, let’s click “Create new” on the left of that Start screen. That will bring up the New Document dialog. Let’s create a file 1200 pixels wide, and 800 pixels high. Ignore the other settings for now.
When your new document opens up, you’ll probably see an interface laid out something like this:
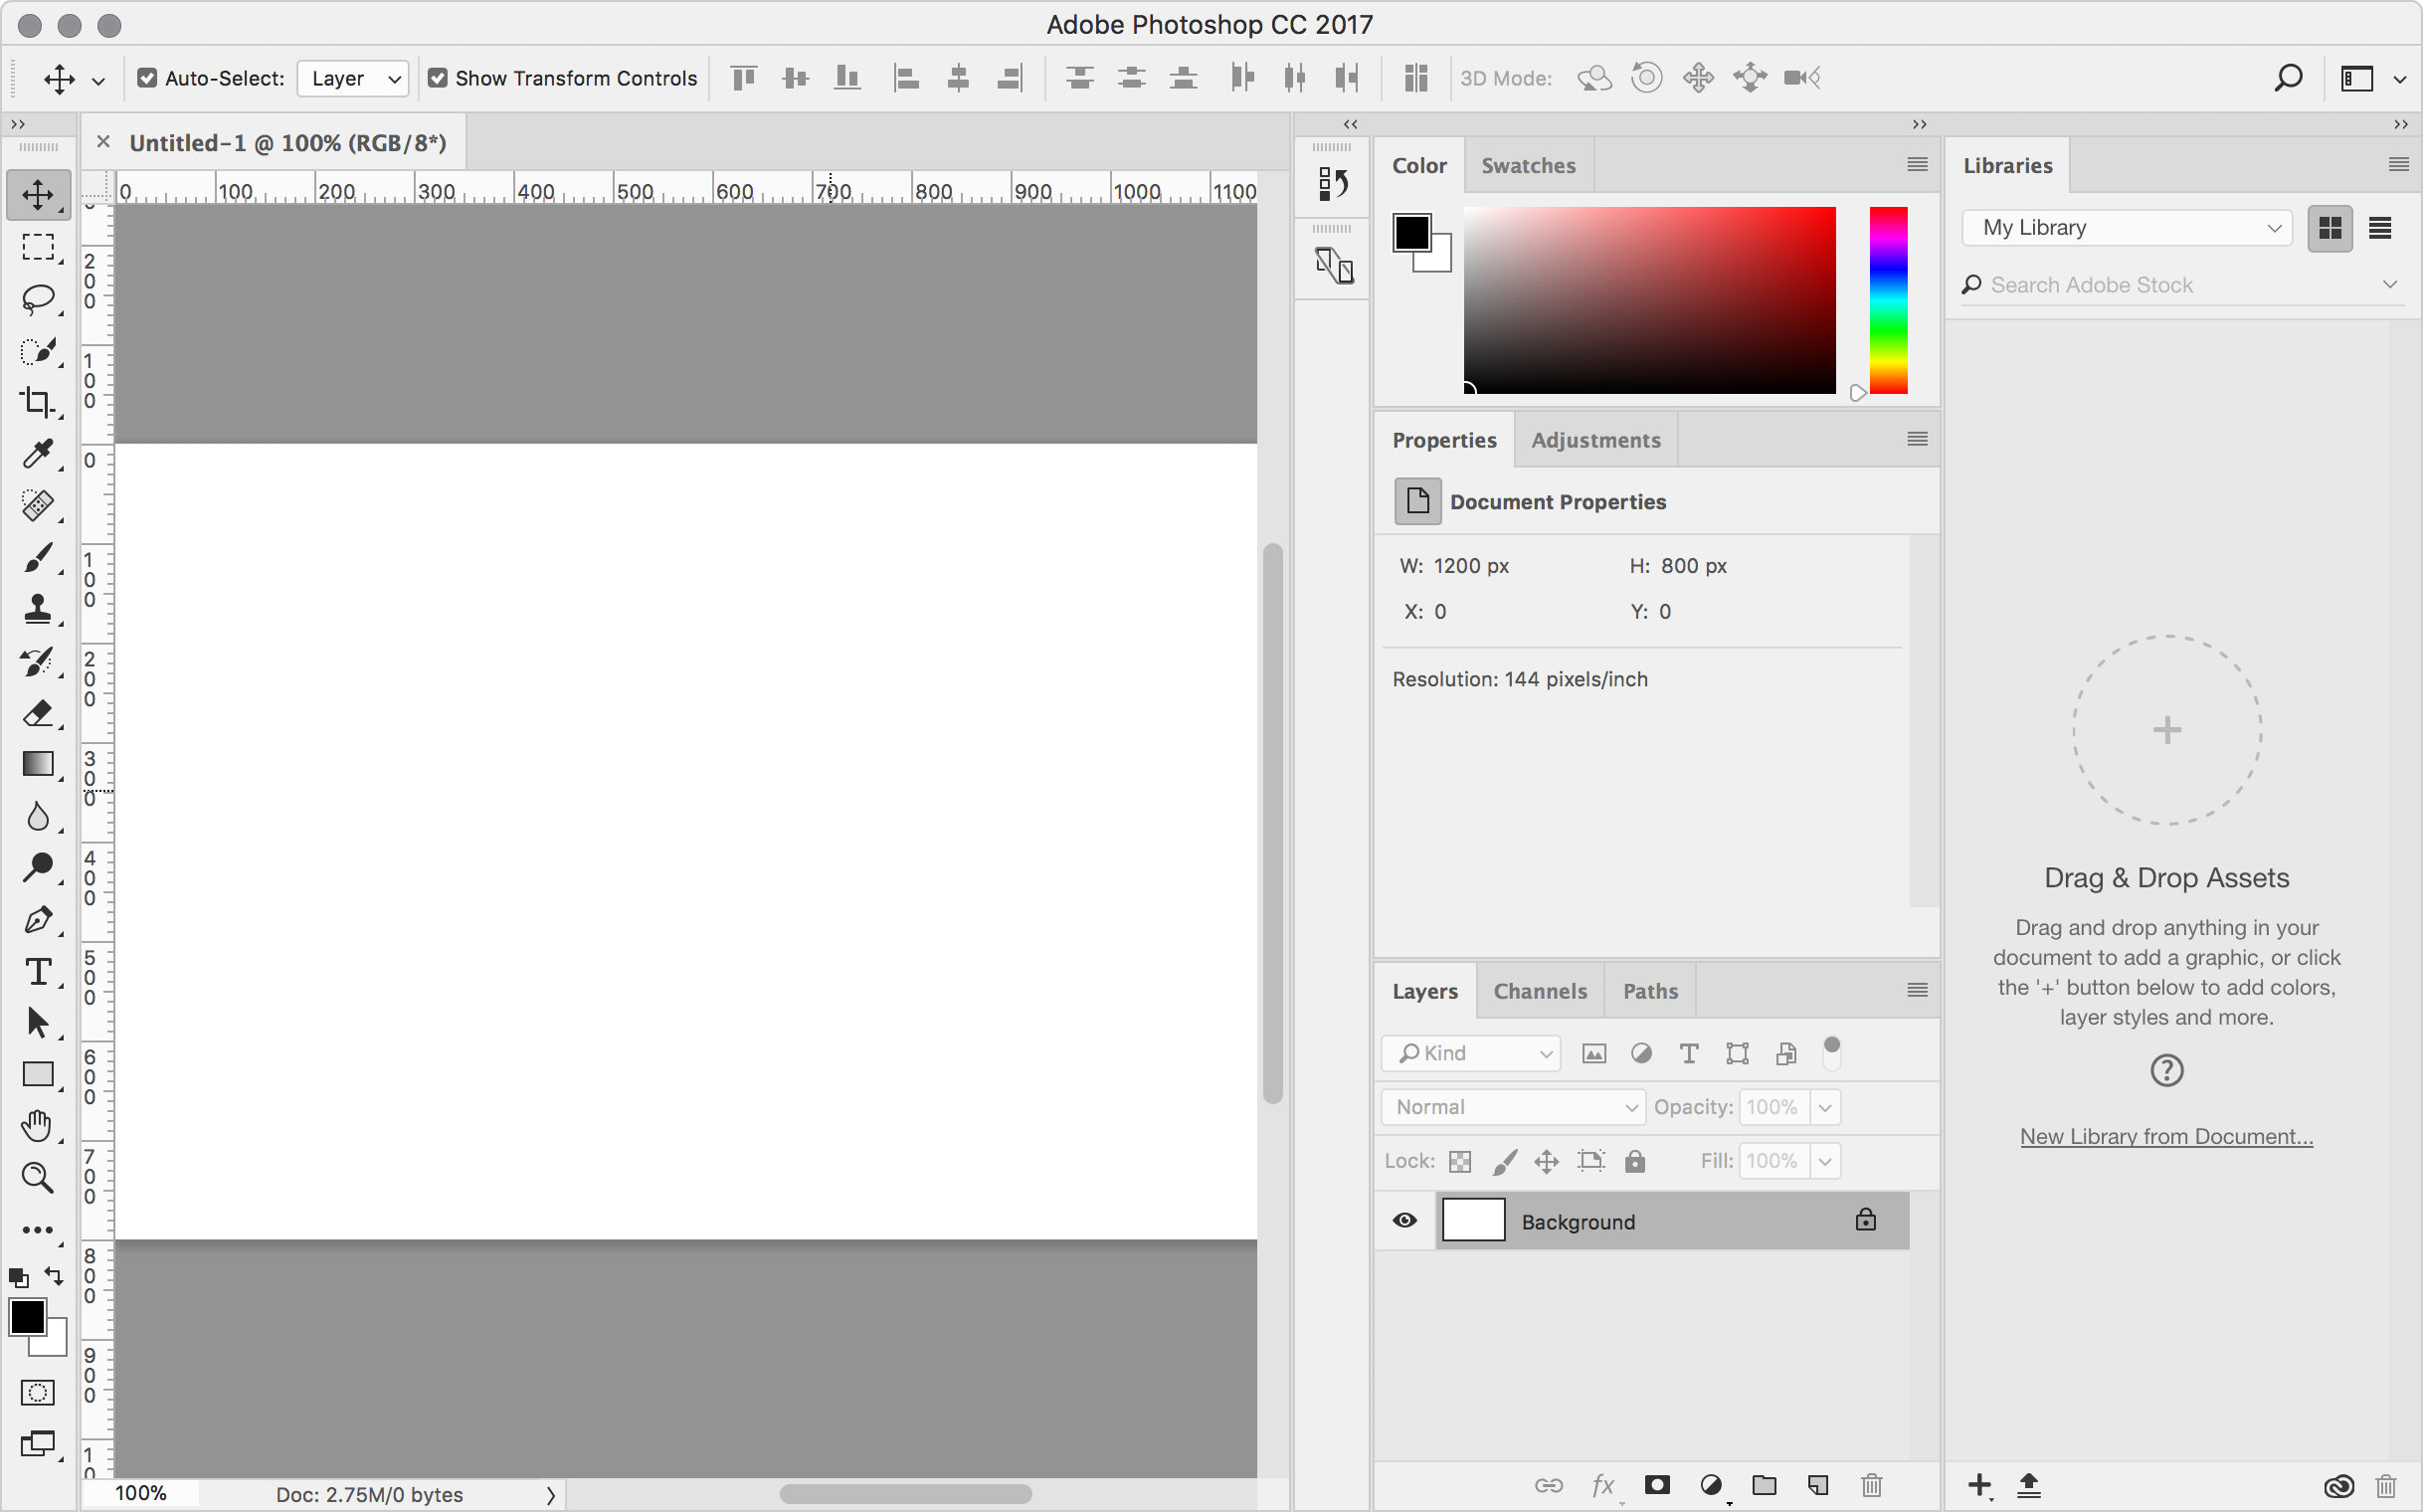
This default layout is called the “Essentials” workspace. A workspace basically means a default arrangement of panels—you can explore the different options by going to the Window > Workspace menu.
For this course, we’re going to stick with the “Essentials” workspace, but let’s tidy it up a bit. For a start, we can close that “Libraries” panel on the right hand side of the window, as we won’t be using it. You can close this, or any panel, by clicking on the little four-line hamburger menu button in the panel and selecting “Close”. Let’s also close the History and Device Preview panels (you’ll need to expand them first):
To get a panel back, head up to the “Window” menu and click on the one you need. You can also rearrange panels by clicking on the panel name and dragging it over to join another group of panels. This can often save quite a bit of screen space and make it easier to work on your document.
Here’s an annotated screenshot of how your screen should now look:
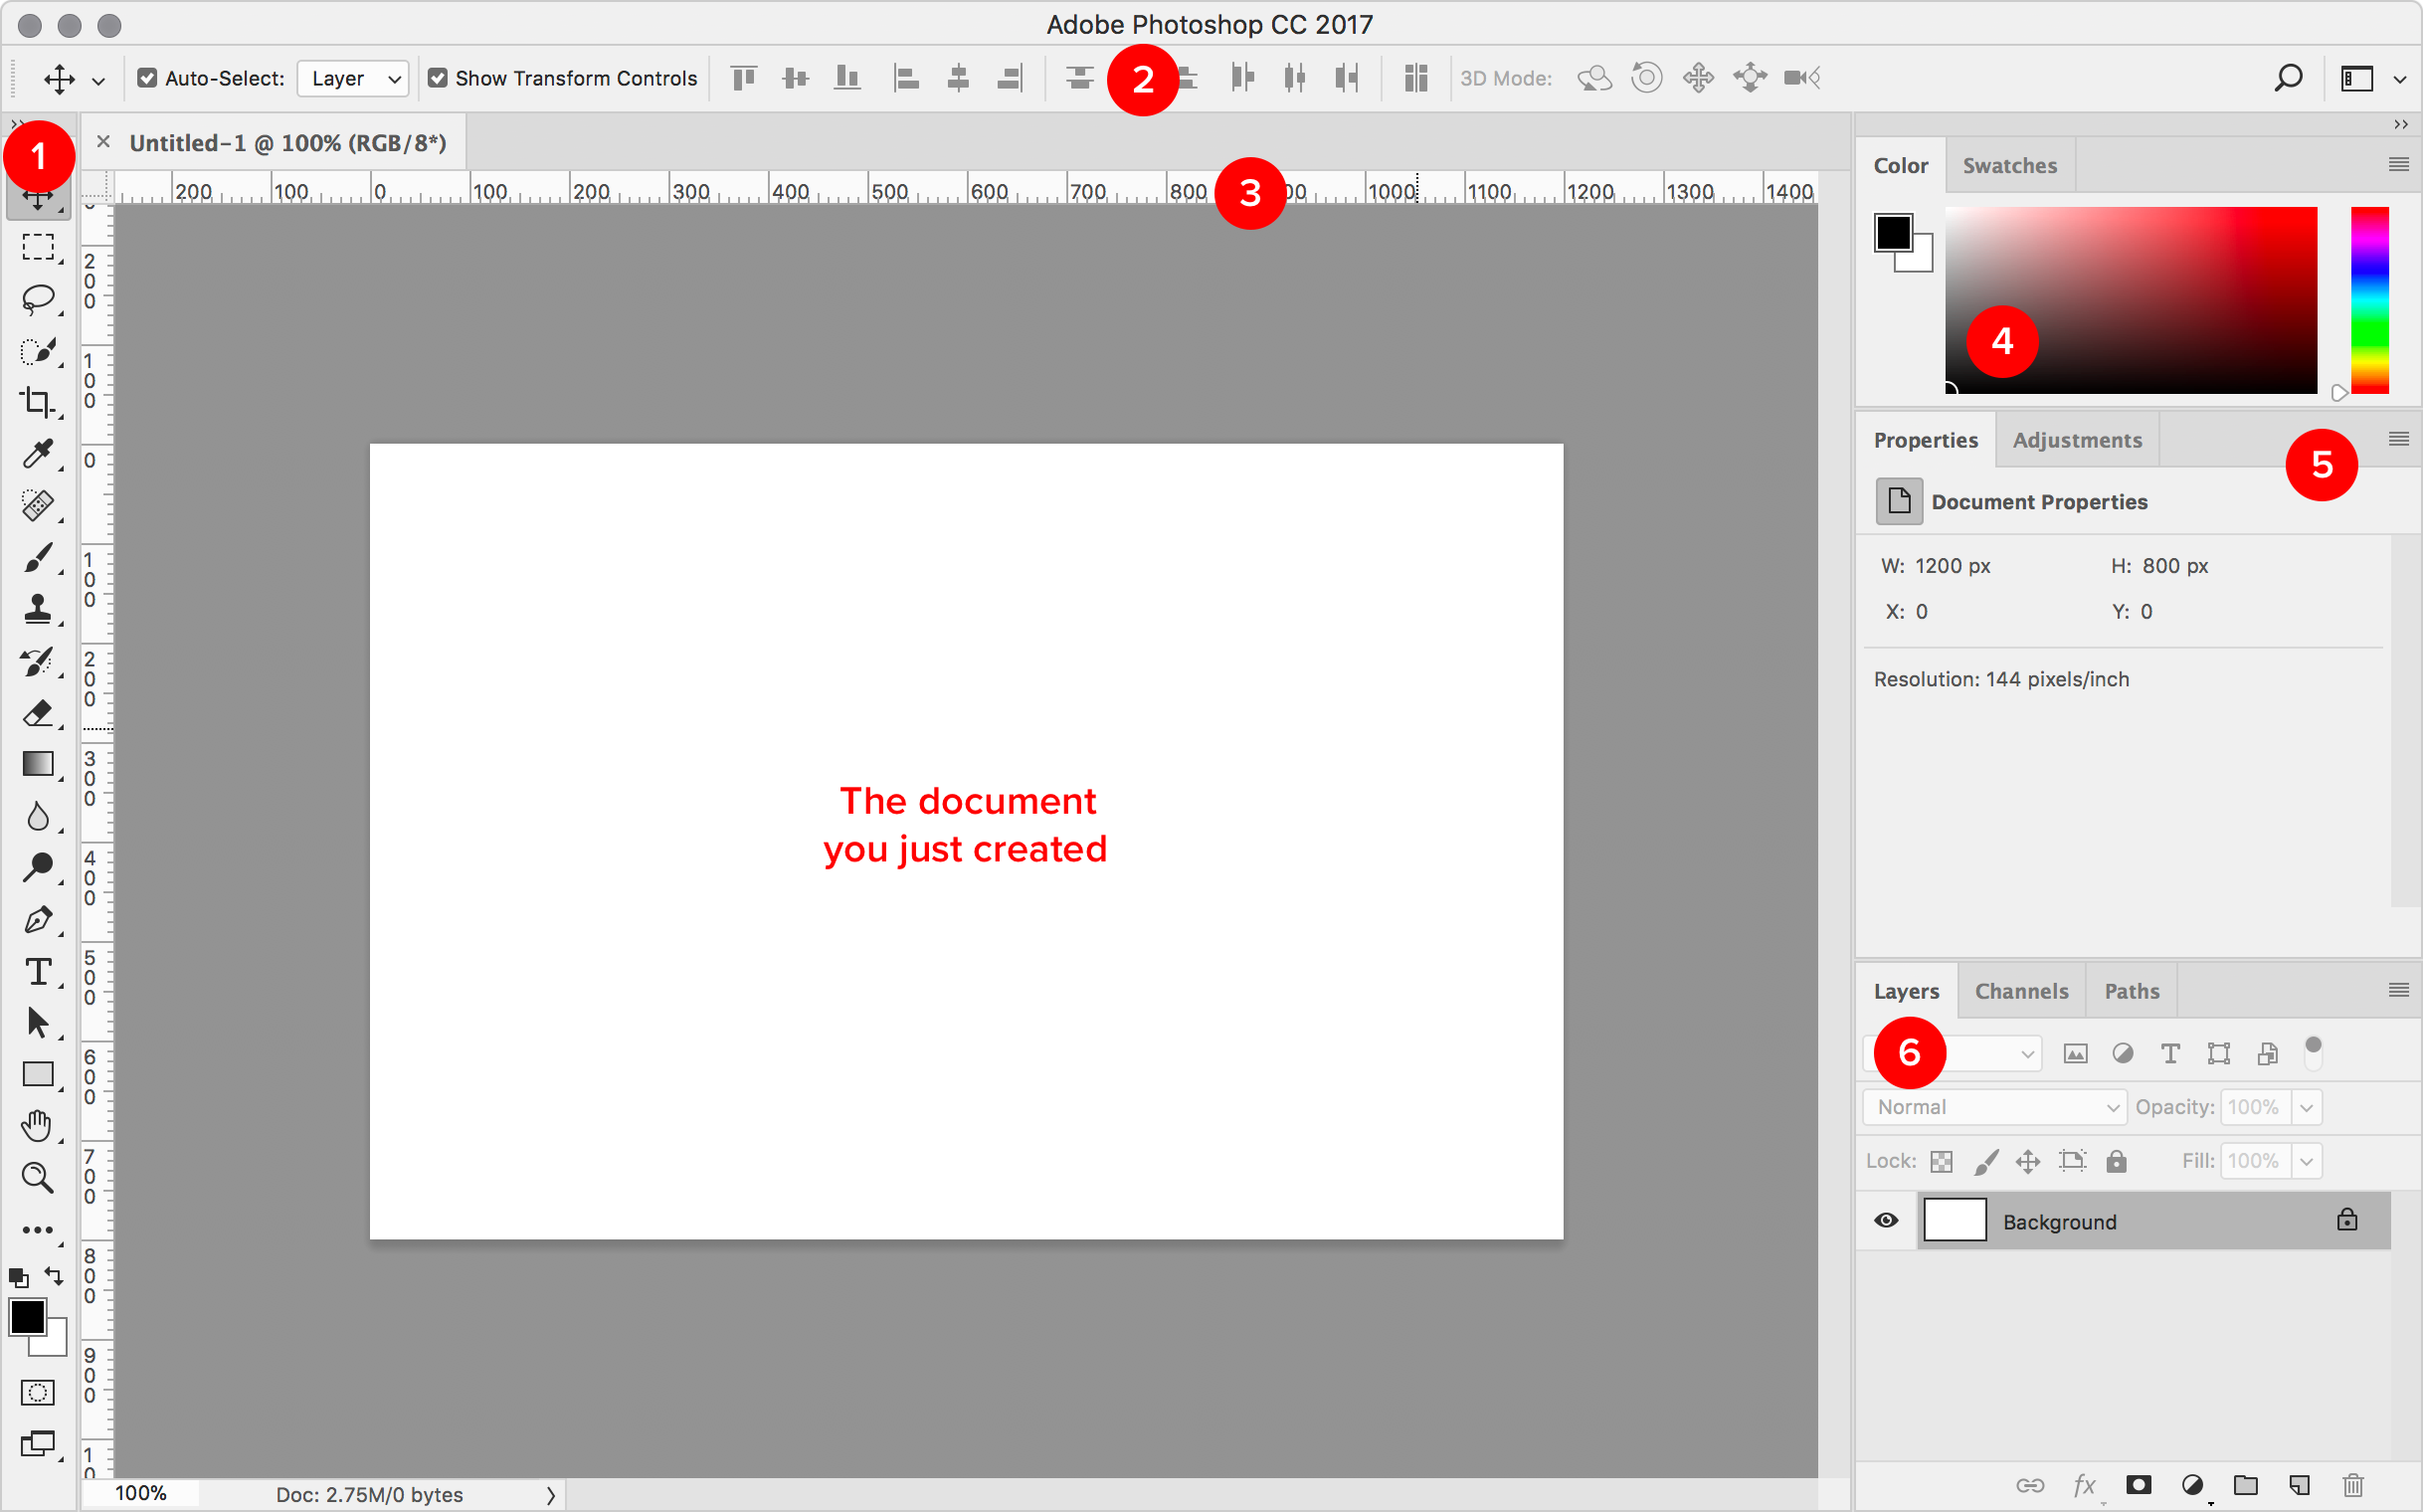
- Tools panel. Where to find most of the commands, brushes, and selection tools you will want to use regularly.
- Options panel. Displays contextual options for whatever tool you have selected. In this screenshot, we’ve got the Move tool selected, so we’re seeing options associated with that tool.
- Rulers. These are displaying pixel units because we changed that option in Preferences earlier. You can toggle rulers on and off with [[⌘]] [[R]].
- Color picker. Choose your foreground and background color settings here.
- Properties panel. This is another contextual panel, which displays information and options for whatever layer you have selected. For example, if you have a “live shape” selected, like a rectangle, this is where you can change its color, corner radius, size, and position.
- Layers panel. You’ll interact with this panel constantly when using Photoshop. As well as being the place to find and select the element you want to work with, you can also use it to move layers backwards and forwards, and apply filters, adjustments, and other effects.
An overview of the Tools panel
Before we finish for today, let’s take a closer look at the Tools panel. Feel free to experiment with them, but don’t worry about understanding them all just yet—we’ll be introducing most of them individually during the coming week.
For ease of reference, you can download this overview as a handy PDF cheatsheet at the end of today’s content!
Move (Shortcut: V)
Moves the selected layer or area.
Toolset also contains: Artboard Tool
Marquee (Shortcut: M)
Selects a rectangular area of pixels.
Toolset also contains: Elliptical Marquee, Column Marquee Tools
Lasso (Shortcut: L)
Selects an area in a freeform shape.
Toolset also contains: Polygonal Lasso, Magnetic Lasso
Quick Selection (Shortcut: W)
Selects an area based on similarity of pixel colors.
Toolset also contains: Magic Wand
Crop (Shortcut: C)
Trims the document down to a selected area.
Toolset also contains: Perspective Crop, Slice, Slice Select
Eyedropper (Shortcut: I)
Picks a color from existing pixels.
Toolset also contains: 3D Eyedropper, Color Sampler, Ruler, Note, Count
Spot Healing Brush (Shortcut: J)
Clones an area of the image and blends it with the target area.
Toolset also contains: Healing Brush, Patch Tool, Content Aware Move, Red Eye
Brush (Shortcut: B)
A drawing tool for creating a textured effect with soft strokes.
Toolset also contains: Pencil, Color Replacement Tool, Mixer Brush
Clone Stamp (Shortcut: S)
Duplicates an area of the image in a target area.
Toolset also contains: Pattern Stamp Tool
History Brush (Shortcut: Y)
Copies from one state to another state, but only at the same location.
Toolset also contains: Art History Brush
Eraser (Shortcut: E)
Replaces pixels with empty pixels, or background color if layer is locked.
Toolset also contains: Background Eraser, Magic Eraser
Gradient (Shortcut: G)
Creates a gradient effect on click and drag.
Toolset also contains: Paint Bucket ("Fill" Tool), 3D Material Drop
Blur (no default shortcut)
Acts like a brush to blur the underlying pixels.
Toolset also contains: Sharpen, Smudge
Dodge (Shortcut: O)
Acts like a brush to lighten the underlying pixels.
Toolset also contains: Burn (darkens the underlying pixels)
Pen (Shortcut: P)
Vector drawing tool, like the Pen tool in Illustrator and Sketch.
Toolset also contains: Freeform Pen, Add/Delete Anchor Point, Convert Point
Type (Shortcut: T)
Adds text on a horizontal plane.
Toolset also contains: Vertical Type, Horizontal/Vertical Type Mask
Path Selection (Shortcut: A)
Selects and moves a vector path's anchor points.
Toolset also contains: Direct Selection Tool
Rectangle (Shortcut: U)
Draws a rectangular Shape layer.
Toolset also contains: Rounded Rectangle, Ellipse, Polygon, Line, Custom Shape
Hand (Shortcut: H)
Allows movement around the document using click and drag.
Toolset also contains: Rotate View
Zoom (Shortcut: Z)
Zooms in and out of the document.
Edit Toolbar
Allows these default options to be changed.
Day 1 is complete!
Tomorrow, we’ll get started with creating our landing page design. Any questions about today’s introduction? Let us know in the comments or over on Twitter and we’ll be happy to help :)
Workflow Basics
Start as you mean to go by adopting a robust, non-destructive workflow.