Today’s learning objectives
Yesterday, we set up Sketch and got familiar with the interface, including the toolbar, inspector, artboards and grids! Today, we’re going to build on this by learning how to...
- Use the rectangle shape tool
- Select & edit the points in a shape
- Align objects horizontally and vertically
- Learn the “Union” & “Subtract” commands
- Practice the Rotate function
- Change fill and border settings
Reading & doing time: 30 mins
Day 2 Tutorial: Create a simple logo
1. Open up Sketch!
Open up your Sketch file from yesterday, and head to the “Day 2” artboard. Remember, in design, iteration is key — duplicating your artboard each time you make a significant change to a design means that you can easily go back to an earlier version. You can also see the development of a project at a glance, which can be pretty amazing!
2. Draw a square
Press [R] to bring up the Rectangle tool. Draw a square by clicking and dragging in your artboard, while holding down the [shift] key. The shift key “constrains” the proportions of the rectangle, creating a square. Let’s make the square 64 by 64 pixels. You can set this in the Inspector after drawing the shape – you don’t have to drag it pixel perfect first time.

3. Duplicate it and open up the shape’s points
Select the square, and press ⌘ + [D] to duplicate it. Now, double click the square. Double clicking any shape will allow you to edit the points of that shape. You can tell when you’re in the points editor, because the handles on the corners of the shape turn into circles instead of squares.
4. Make the second square into a triangle
Now, select one of these points and press backspace to delete it. You now have a triangle. To exit the points editor, click outside the object, or press [enter] or [escape]. All do the same thing, taking you back to the previous layer.
5. Rotate the triangle
Next, let’s rotate the triangle so that the long edge is horizontal. To rotate, select the object you want to rotate, and either click “Rotate” in the toolbar, or press ⌘ + [shift] + [R]. If you move the mouse pointer around the object, you should now see a little rotate handle. You can click and drag anywhere to do a free rotation, but often you will want to constrain the rotation so that it is only moving in 15 degree increments. Again, you constrain the rotate tool by pressing [shift] while clicking and dragging. Rotate it so that the longest edge of the triangle is horizontal and at the bottom.
6. Unite the square and the triangle into a single shape
Sketch allows us to take two shapes and combine them so that they behave as a single shape. To do this, drag the triangle so that it’s just above the square - now our house has a roof! Place the triangle so that it’s just overlapping the square. Now, drag around the two shapes so that both are selected, and then click the “Union” button on the toolbar. This merges the two shapes so that they become one.

7. Create a rectangle and align it horizontally and vertically
Next, let’s draw a small rectangle over the top of our house shape. This will be the door of our house. After you’ve drawn the door, place it on top of the house shape. Again, select both shapes, then make sure they are centered relative to one another using the alignment tools shown in the GIF below. Also, make sure that the door is aligned to the bottom of the house shape by clicking the “Align bottom” button.
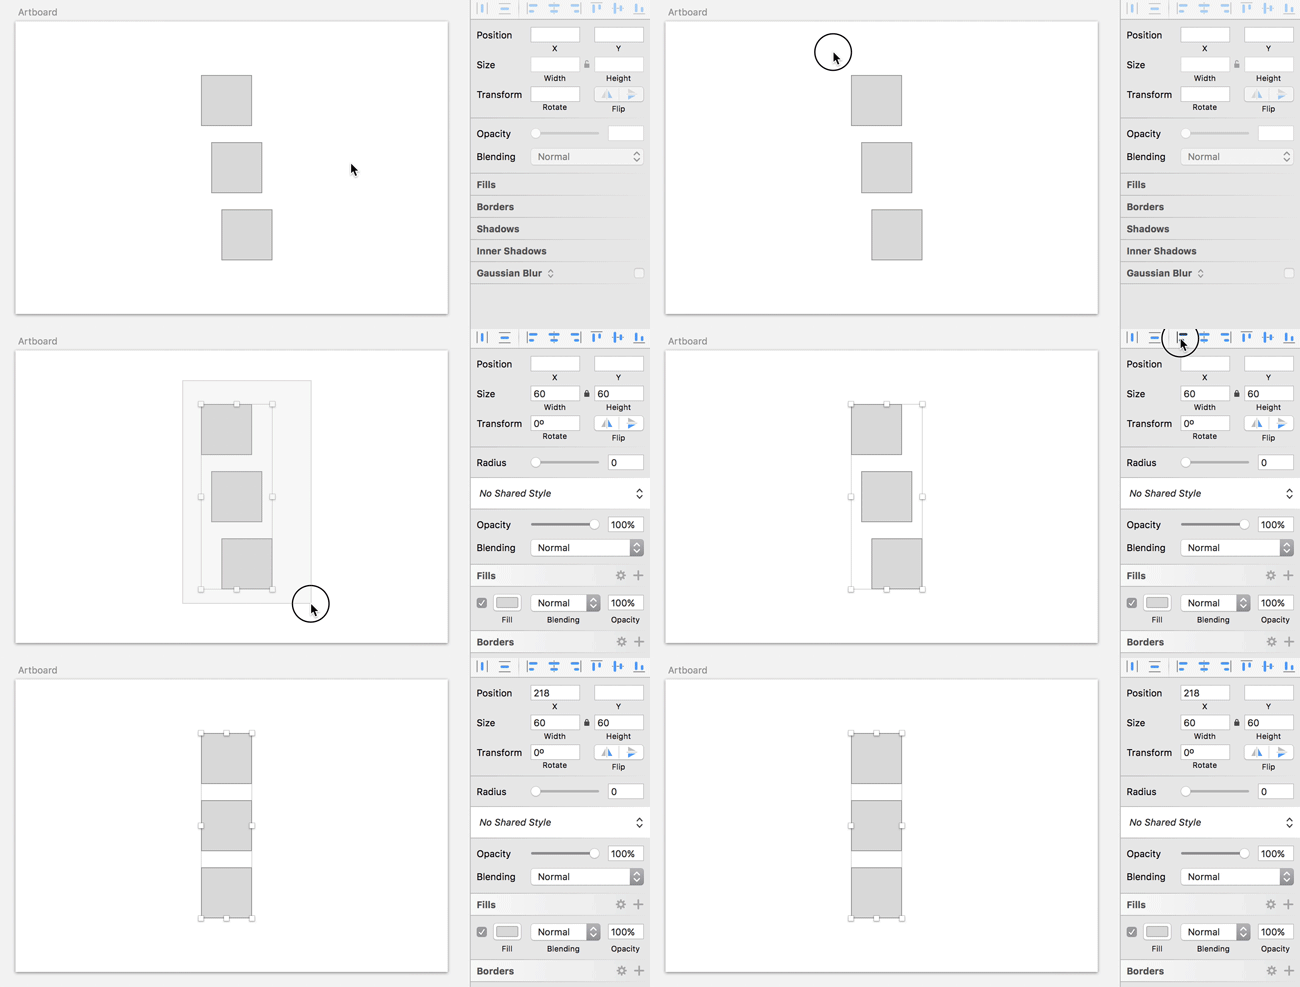
Here’s an example of how the align tool works.
8. Subtract the rectangle from the other shape
Now, still with both the house shape and the door selected, click the “Subtract” button in the toolbar. The Subtract function will use the frontmost shape to “cut out” space in the object that’s below it. Now your house has a door, and you have a house icon as a single shape!

9. Edit the border and fill
Finally, let’s make our new home icon look a bit more attractive. Select the object and choose a fill color. Also, let’s un-check the border, so that the shape has a nice clean edge.
10. Duplicate your artboard
And rename it “Day 3” ready for tomorrow!
Congrats on completing Day 2! How did you find working with the tools and commands introduced today? Let us know in the comments or hit us up on Twitter.
Bonus material

Corner Radius, Text, and Grouping
Create buttons with the corner radius setting and the type tool.


