Today’s learning objectives
So far in Sketch 101 we’ve looked at lots of the app’s basic features, including shapes, alignment, and text boxes. We’ve used those features to create a simple logo, buttons, and a card design. Today, we’re going to transform our card into a Symbol! We’ll be learning...
- Why and when Symbols are valuable
- How to create a Symbol
- Use overrides
- Locking elements within a Symbol
Reading & doing time: 30 mins (Symbols can be a little bit fiddly until you get used to them!)
In Sketch, Symbols allow you to turn an object or group of objects into a kind of mini-template. The big advantage of this is that once you’ve created a Symbol, you can insert multiple “instances” of it into your document. Then, we can enter a “master” view for the Symbol and any changes we make will be reflected in all the instances in the document.
Symbols can also be “nested” within one another, which can be useful in more complex designs, where design elements are used in a range of contexts. Today, we’re going to use the card design we created yesterday and turn it into a Symbol that can easily be re-used and updated.
Day 5 Tutorial: Create, use and edit a Symbol
1. Open up your Sketch document, and create a Symbol
First, check that you’re working in a duplicate artboard that you’ve renamed “Day 5”. Then click and drag around all the objects that make up your card. Once all the elements are selected, click “Create Symbol” in the Toolbar at the top of the screen. You can also access this command from the “Layer” menu.
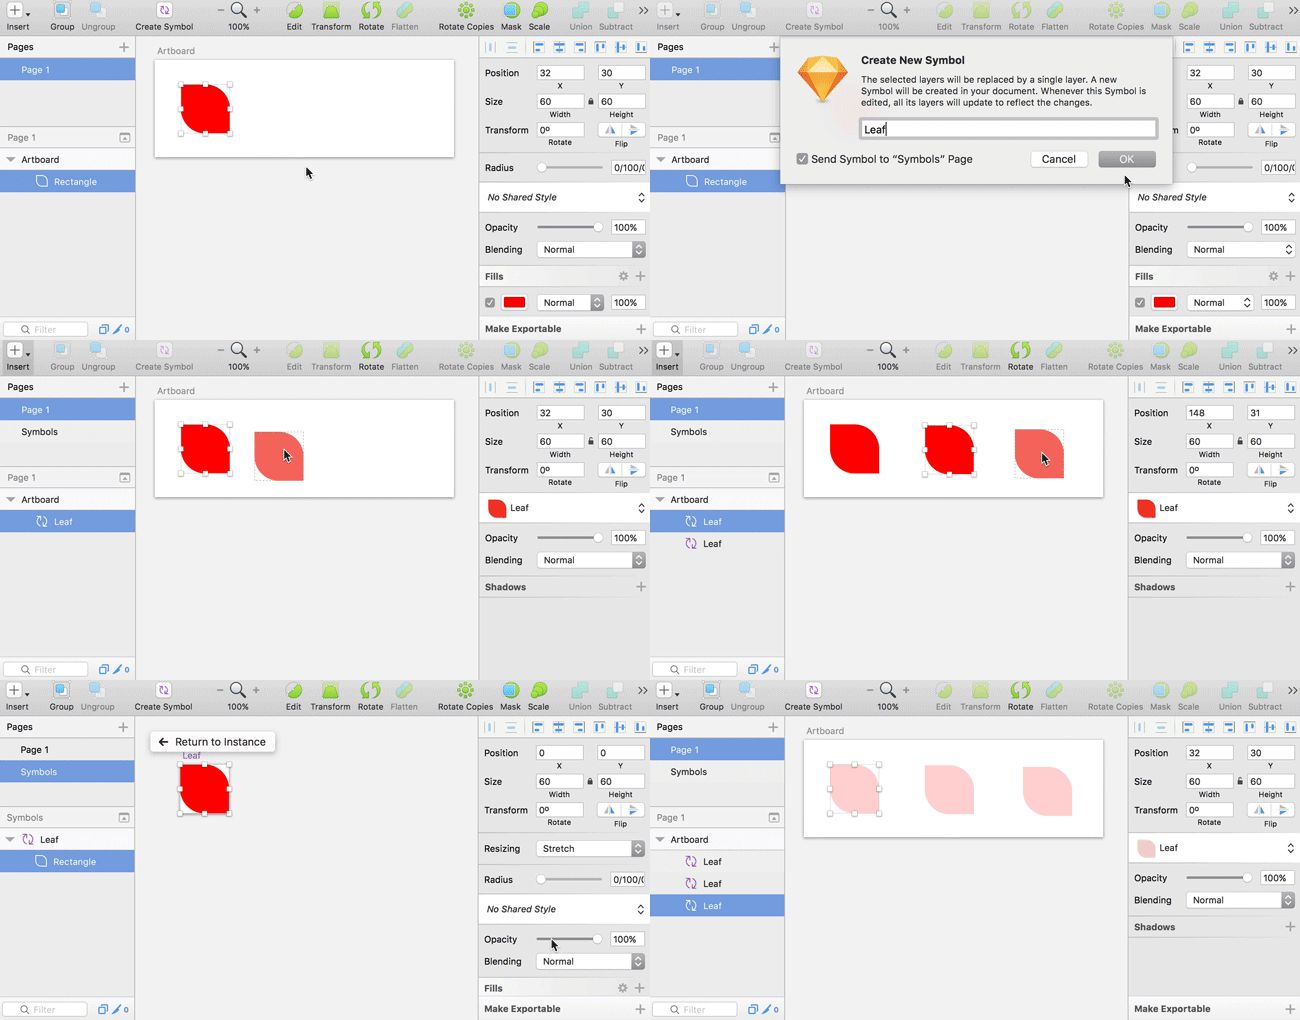
Here’s an example of how creating a Symbol works.
2. Name your Symbol
A dialog box will pop up. As with all objects in Sketch, it is helpful to give our Symbol a name that will help us to easily find it later. A Sketch file can often end up with hundreds or even thousands of objects, and it can be pretty dull searching through “Rectangle 452”, “Rectangle 453”, “Rectangle 454” etc. for the exact layer we need. Let’s call this Symbol “Card”.
3. Notice how the the card has changed
Try clicking and dragging the card. Because we’ve turned the card into a Symbol, it now behaves as a single object rather than as multiple objects. Symbols also behave differently from groups, because you can’t ungroup an instance of a Symbol to edit that instance directly. Instead, you have to either edit the Symbol Master, or “detach” the Symbol from its master to turn it back into regular layers. (We can access the “detach” option by right-clicking on any instance.)
4. Find the Symbol master
We can get to the Symbols master editor in a couple of ways. One is to select the “Symbols” page from the top-left “Pages” navigation area. Second, and probably easier most of the time, is just to double-click an instance of a Symbol. Sketch will take you straight to the master editor for that Symbol.

5. Edit the Symbol master
Once you’ve entered the Symbol master view, try changing a couple of things in the card design. For example, let’s change the button color to an impactful blue (#1077FF) and let’s change the text on the button to be white (#FFFFFF).
6. Leave the Symbol master view
To do this, either click “Return to Instance” (top-left of the canvas area), or just click back to your original Page from the top-left Pages navigation area. When you get back to your Canvas, you will see that the Symbol has been updated!
7. Insert more instances of the Symbol
Now we’ve got our Symbol set up, let’s insert more instances of it. To do this, go to Insert > Symbol, and then select “Card”. You can then place your Symbol anywhere on the Canvas, a bit like a rubber stamp. Do this a couple of times to create a row of 3 Symbols on your page. You can also use the Duplicate command on Symbols – try that now by dragging to select the row of 3 cards, press ⌘ + [D], and then drag the copies down to form another row.
8. Edit the Symbol master again
Let’s change our Symbol master again. This time, we’ll try an outlined button with blue text instead. Double click any instance of the Symbol to get to the master copy. Change the button to a white fill (#FFFFFF) and a blue, 2 pixel-wide border (#1077FF), then change the button text color to the blue as well (#1077FF). Leave the master editor. All your cards will be updated to the new design!
9. Change the content of your Symbol instances
Although Symbols allow you to keep the design of each instance the same, they also let you edit the actual content within the design. Select any of the 6 cards and you’ll see that there are fields in the Inspector (right-hand side of the screen) These are called “overrides”, and allow you to change the text and images used in an instance of a Symbol. Try editing some of these overrides. To turn off overrides for a particular element within a Symbol, go into the Symbol master, right-click on the layer you want to lock, and click “Lock Layer”. It won’t be possible to override this now. (Note that any overrides you’ve already set won’t be affected by this.)
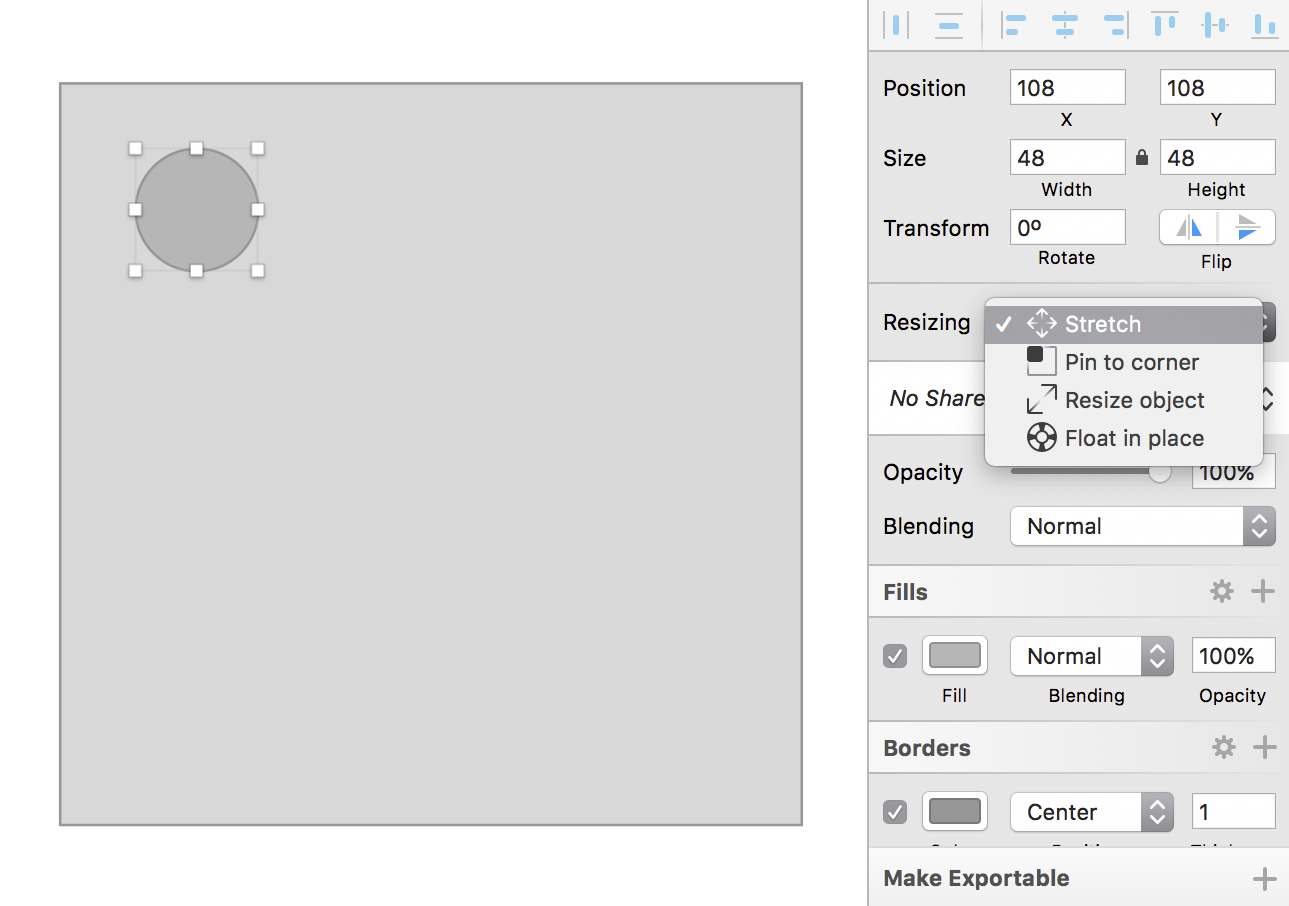
Sketch also allows you to specify how objects within Symbols behave when the Symbol is resized. Try experimenting with the options!
10. Duplicate your artboard and rename it “Day 6” ready for tomorrow!
Today we covered Symbols, which are without doubt one of the Sketch’s most useful features. They will help you to work fast and update designs efficiently. But they can also be fiddly. Are you struggling with anything? Let us know your questions in the comments or in a tweet and we’ll help out!
Bonus material
- Download our Symbols sandbox!
- Check out our Sketch Tips Part 4: Symbols

Bézier Curves and the Pen Tool
Get to grips with the pen tool by making another logo.


