Whether you’re a total novice, a designer in training, or a seasoned pro switching from another product, this article is for you.
- First, we’ll introduce Sketch—what it is, why it’s popular, and how to claim a free trial and install it on your Mac.
- Second, we’ll explore Sketch’s user interface, explain the basics, and walk you through some tips and tutorials.
- Third, we’ll take a look at some of the app’s more advanced features (Bézier curves and blending modes are especially fun).
- And finally, we’ll share our free 99-point Sketch Cheat Sheet to download and refer to as you learn.
1. Why Sketch?

For a while after its initial release in 2010, Sketch was regarded as a lightweight graphics tool that enabled user interface (UI) and user experience (UX) designers to quickly mock-up app designs.
But Sketch has come a long way in the past few years—and its capabilities now extend far beyond creating screen mockups. As a young product built for today’s needs, it doesn’t have any of the bulk that comes with the legacy compatibility demanded of Adobe’s Creative Cloud suite of products. (See our Sketch vs Illustrator article for more about that.)
Sketch is now proudly marketed to visual, mobile, icon, web, and product designers—and I think it’s only a matter of time until its developers, Bohemian Coding, are confident enough to pitch the software to illustrators and artists as well.
What is Sketch?
Sketch is one of a group of programs called vector-based graphics editors. Other well known vector-based apps include Adobe Illustrator, CorelDRAW, and OpenOffice Draw.
A vector editor is different from the other main kind of graphics package, which is known as a pixel or raster editor. In a pixel graphics editor (like Adobe Photoshop, GIMP, or Microsoft Paint), when you draw a shape, what gets saved is just a lot of pixel data, which looks like a circle from a distance:
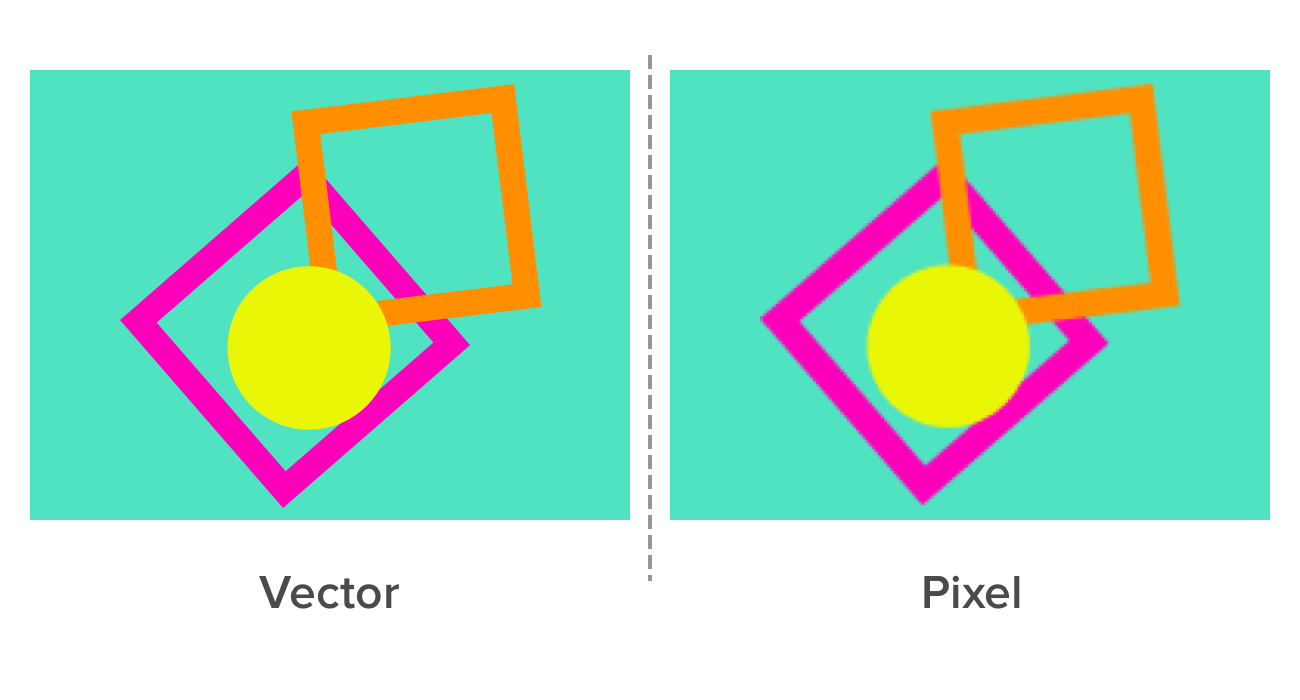
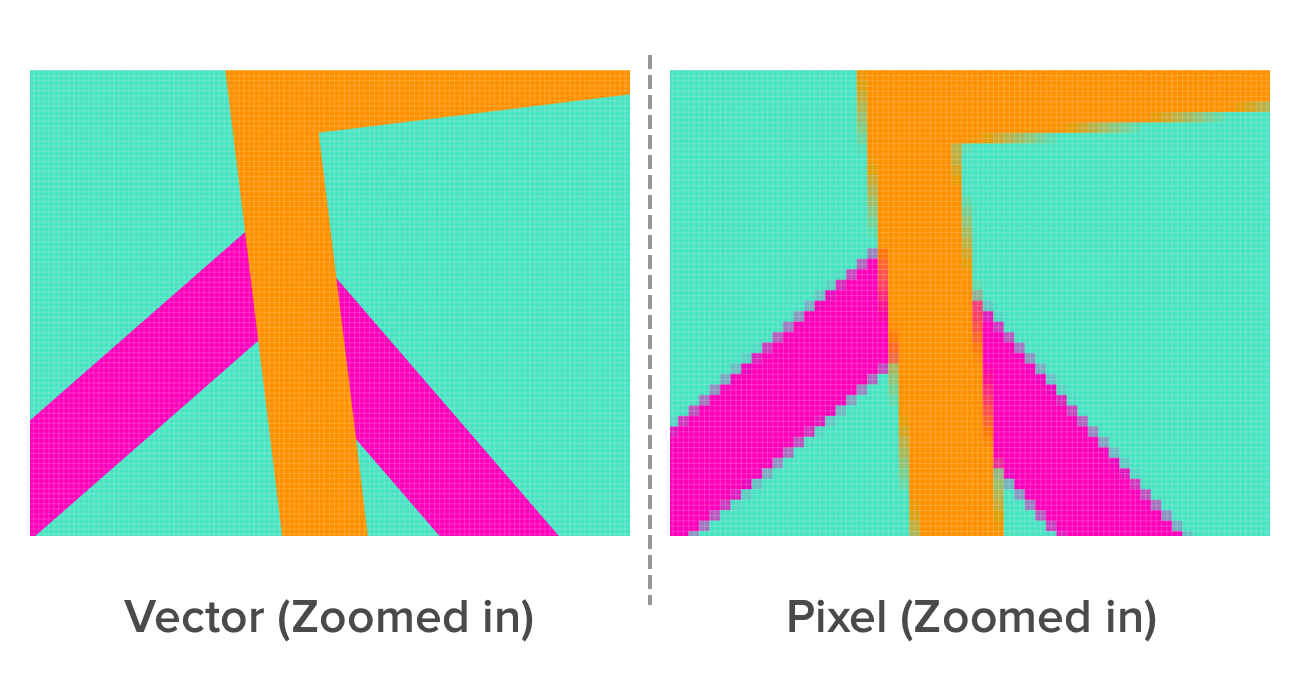
But in a vector-based package like Sketch, what gets saved is some mathematical cleverness that plots the shape itself. In practice, this means that you can keep zooming in to a vector forever and you will never see any degradation in image quality. Designers and illustrators usually prefer to work with vectors, because they can always be converted to pixels. It’s much harder to go the other way.
In Sketch, unless you paste in pixel graphics like a photograph, all layers are vector-based. Every object is made up of underlying points and curves, which can be viewed and edited by double clicking on any shape. But we’ll come back to that later!
Good things come in small packages
Sketch has become a significantly more mature and stable product over the past 12 months. For an app that’s less than 50 megabytes in size, Sketch punches significantly above its weight, and it now has a premium feel that far exceeds its price tag ($99 full price, $49 for students). For comparison, Adobe Illustrator CC is currently hogging over 1000 megabytes of my hard drive.
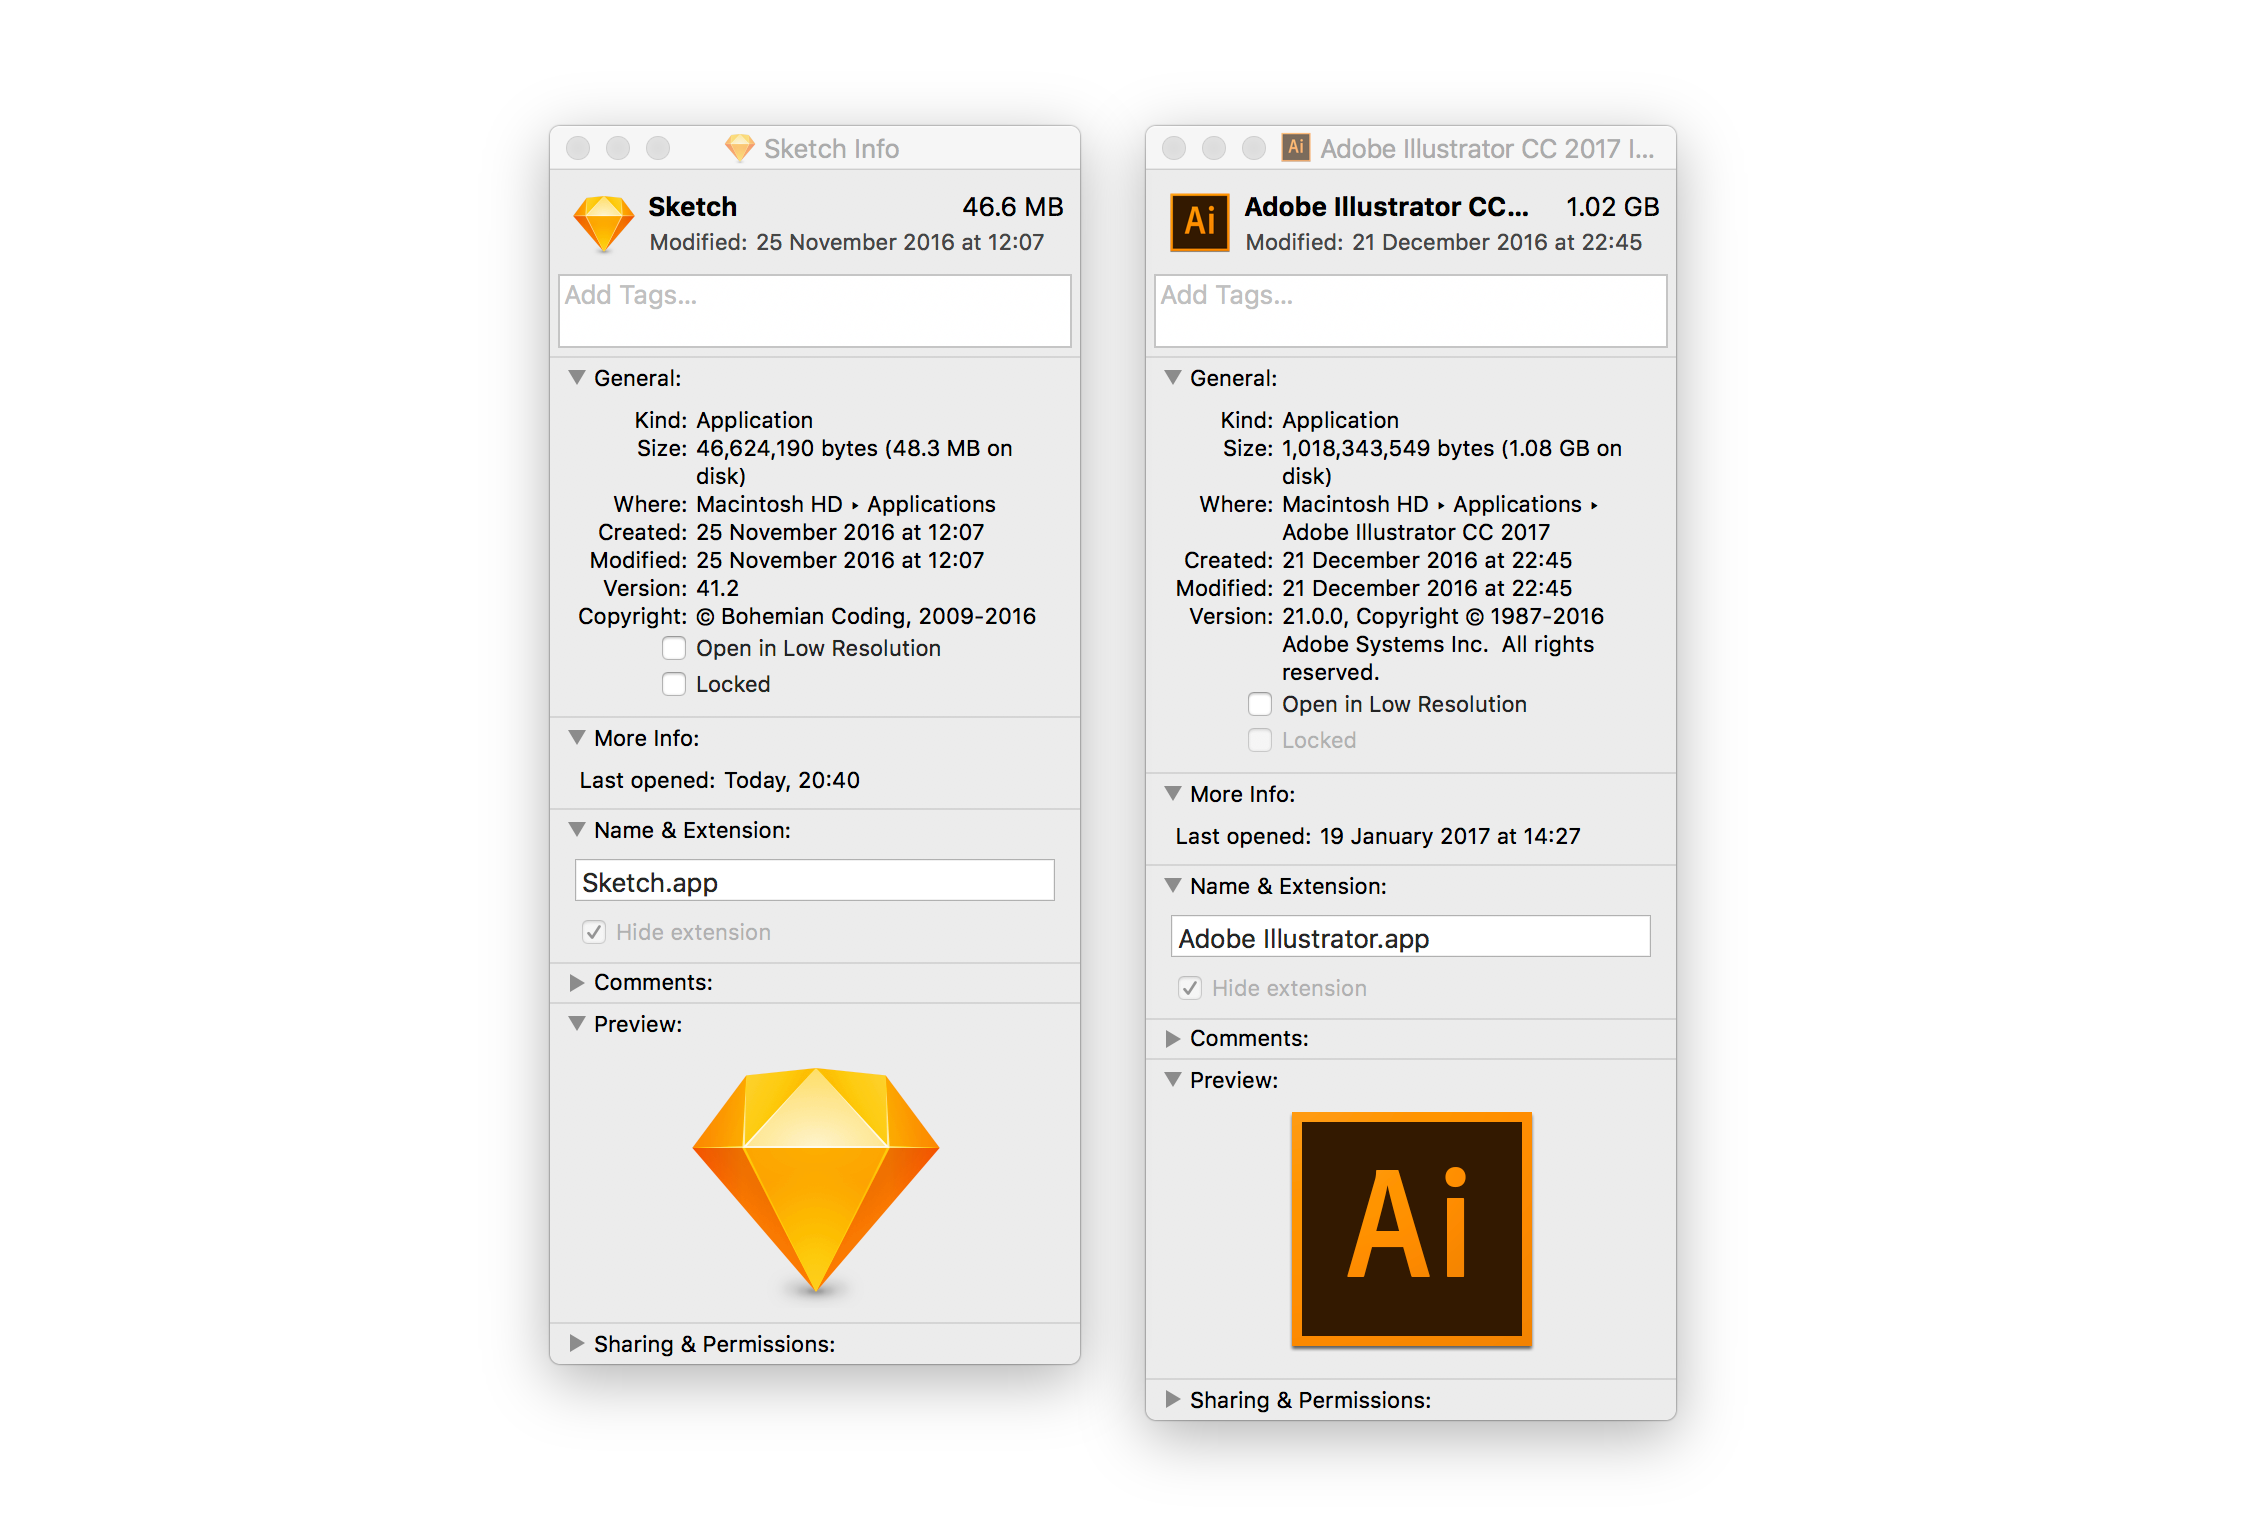
What’s more, Bohemian Coding’s ongoing program of software enhancements means that when there are bugs, they are fixed pretty fast. (If you’re geeky like me, you can check out the update log.)
Sketch’s established rival, Adobe Illustrator, was first released in 1987 (!) and remains the industry standard in traditional design studios. But for a new generation of designers, Sketch presents a huge opportunity to learn the fundamentals and achieve beautiful results.
Learning design in Sketch is rapid, rewarding—and fun. Designer Marc Andrew has even written about how Sketch gave him back him design mojo.
2. Getting Started in Sketch
First, get a copy of Sketch
If you’re brand new to Sketch, check out the Getting Started page on the Sketch site. Sketch will run on any Mac with OS X El Capitan (10.11) or higher, and you can download a 30-day free trial.
Then, find your way around the interface
When you’re working in Sketch, you’ll spend most of your time looking at a screen like this. Here’s a screenshot labelled with the basic areas of the interface and what each one does.
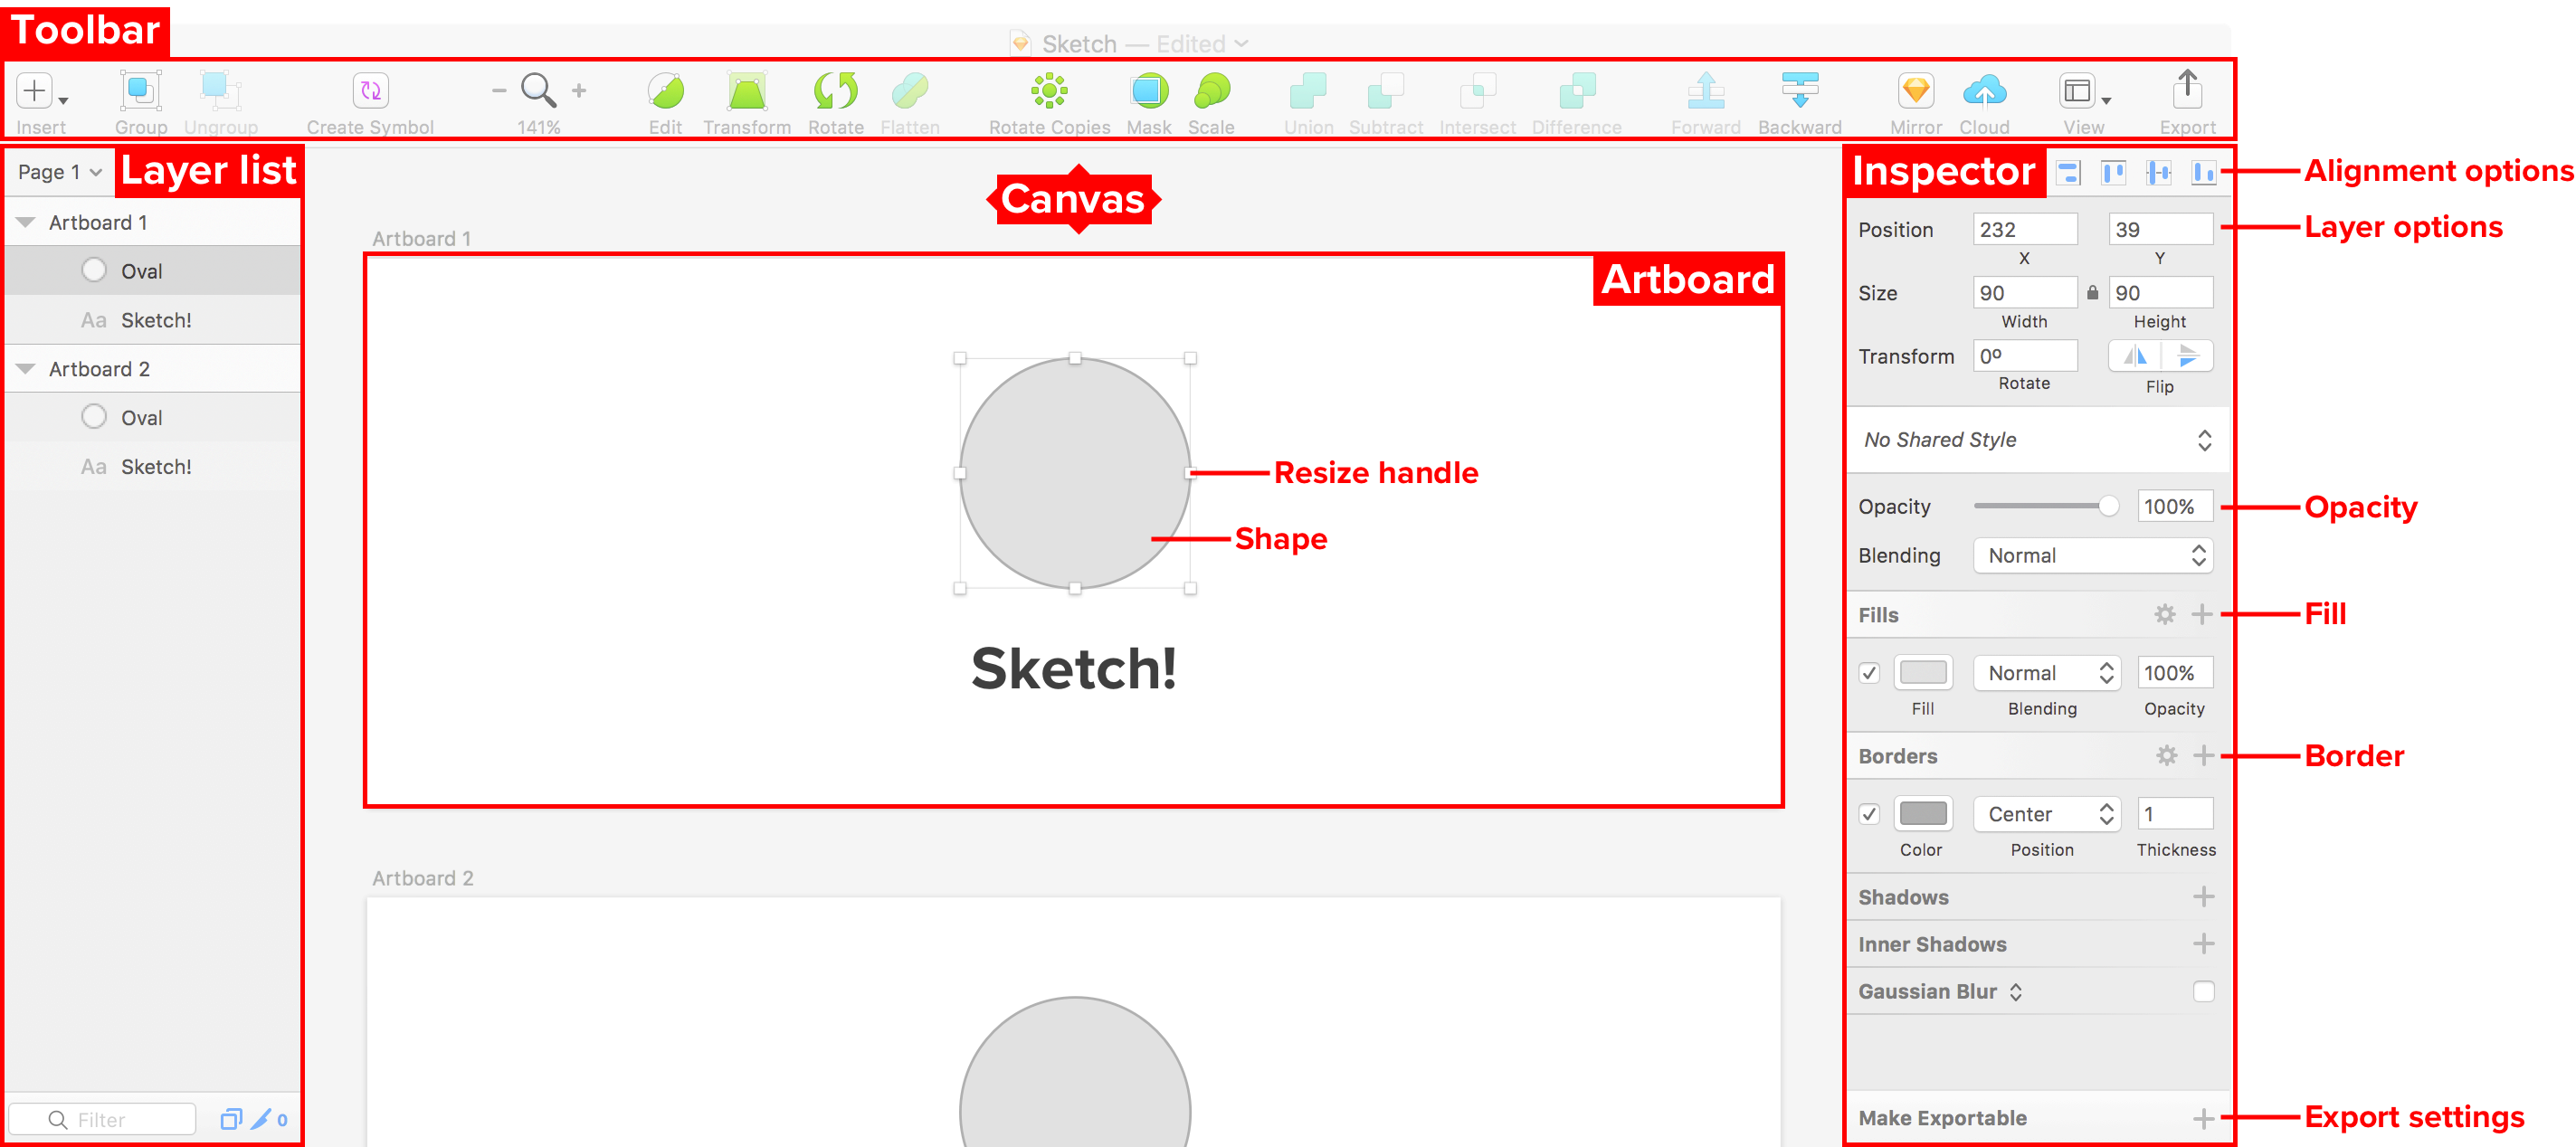
Here’s a more detailed explanation of the function of each area:
- Toolbar: allows you to access frequently used commands. Most commands can also be accessed using a keyboard shortcut, which is quicker. (We’ve got a comprehensive Sketch Cheat Sheet of keyboard shortcuts—available for free download at the bottom of this page.)
- Layer list: this panel shows you a list of everything in the Sketch file you have open. In Sketch, all elements are layers—so a shape like a circle appears in the list as a separate layer, and its position shows which layers it is in front of or behind. You can also give each layer a name.
- Inspector: the Inspector displays detailed information about the selected layer, and allows you to make precise adjustments, For example, you can manually set the X/Y position of a point, or tweak the pixel width of a shape. The Inspector also allows you to set opacity, fill and border setting, layer alignment, shadows, blurs, and export settings.
- Artboard: Sketch organises your work within pages and artboards. Artboards allow you to create multiple compositions on the same page. This can be especially useful for maintaining efficient workflow. For example, you might want to keep a record of each iteration when you’re working on developing a logo, or you might want to create screen mockups for multiple devices on the same canvas. Each Sketch document can contain multiple pages (a page is basically a fresh canvas), and each page can contain multiple artboards. Think of an artboard as a frame that you can place around a design.
Next, get familiar with some important commands
a. Creating artboards
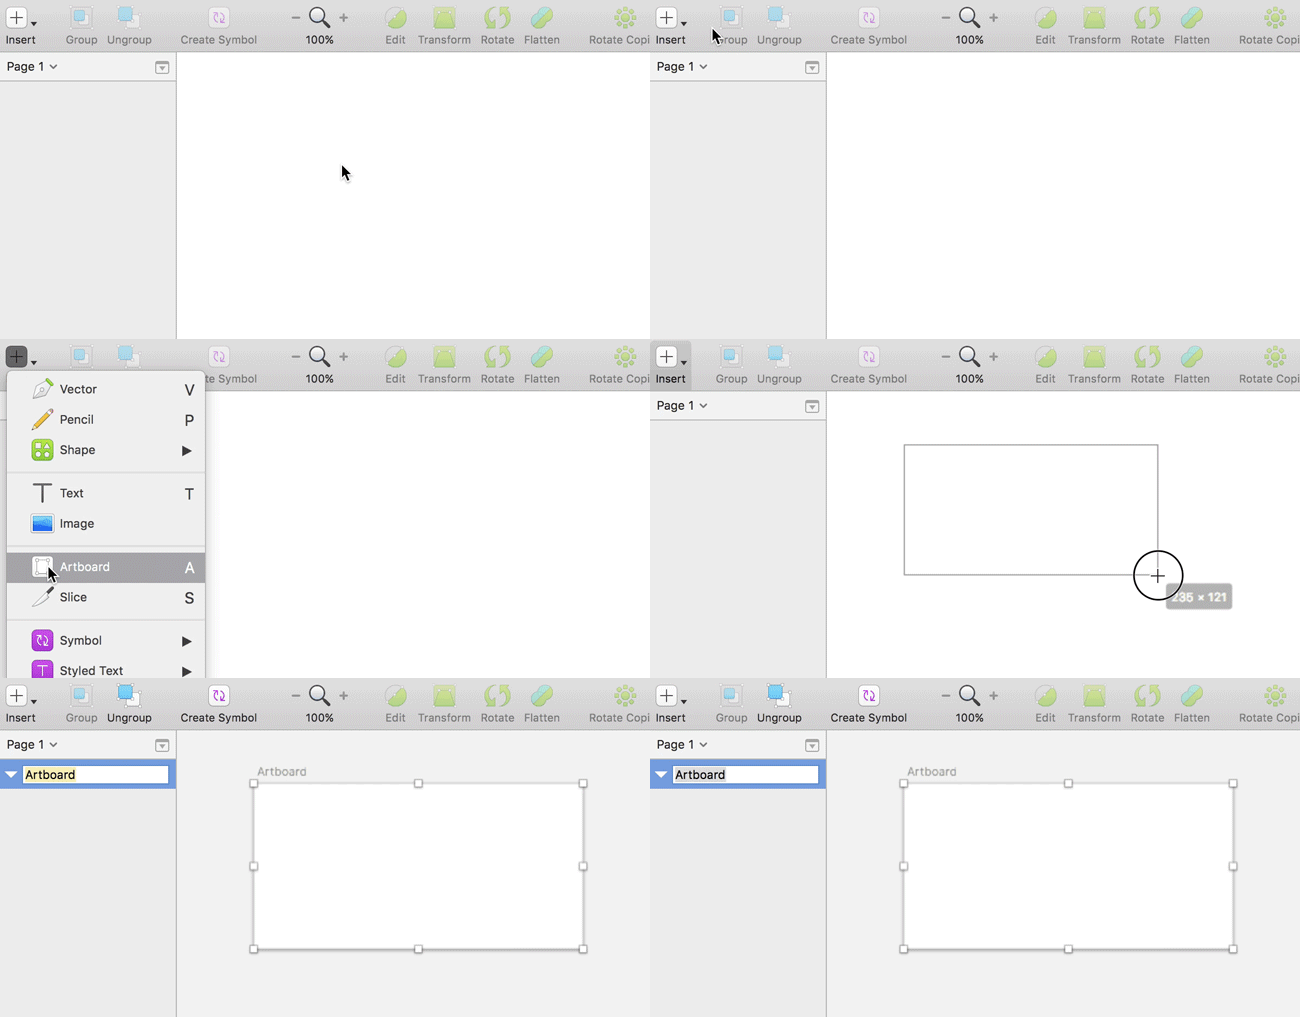
When you first open Sketch, you’ll have a blank canvas. The first thing you’ll want to do is to create an artboard, which will keep your designs organized. You can have as many artboards as you want on a single page.
To create a new artboard, click “Insert” on the Toolbar, then select “Artboard”, and click and drag out a rectangle on the canvas. Alternatively, just press “A” on your keyboard, and then click and drag.
b. Drawing shapes
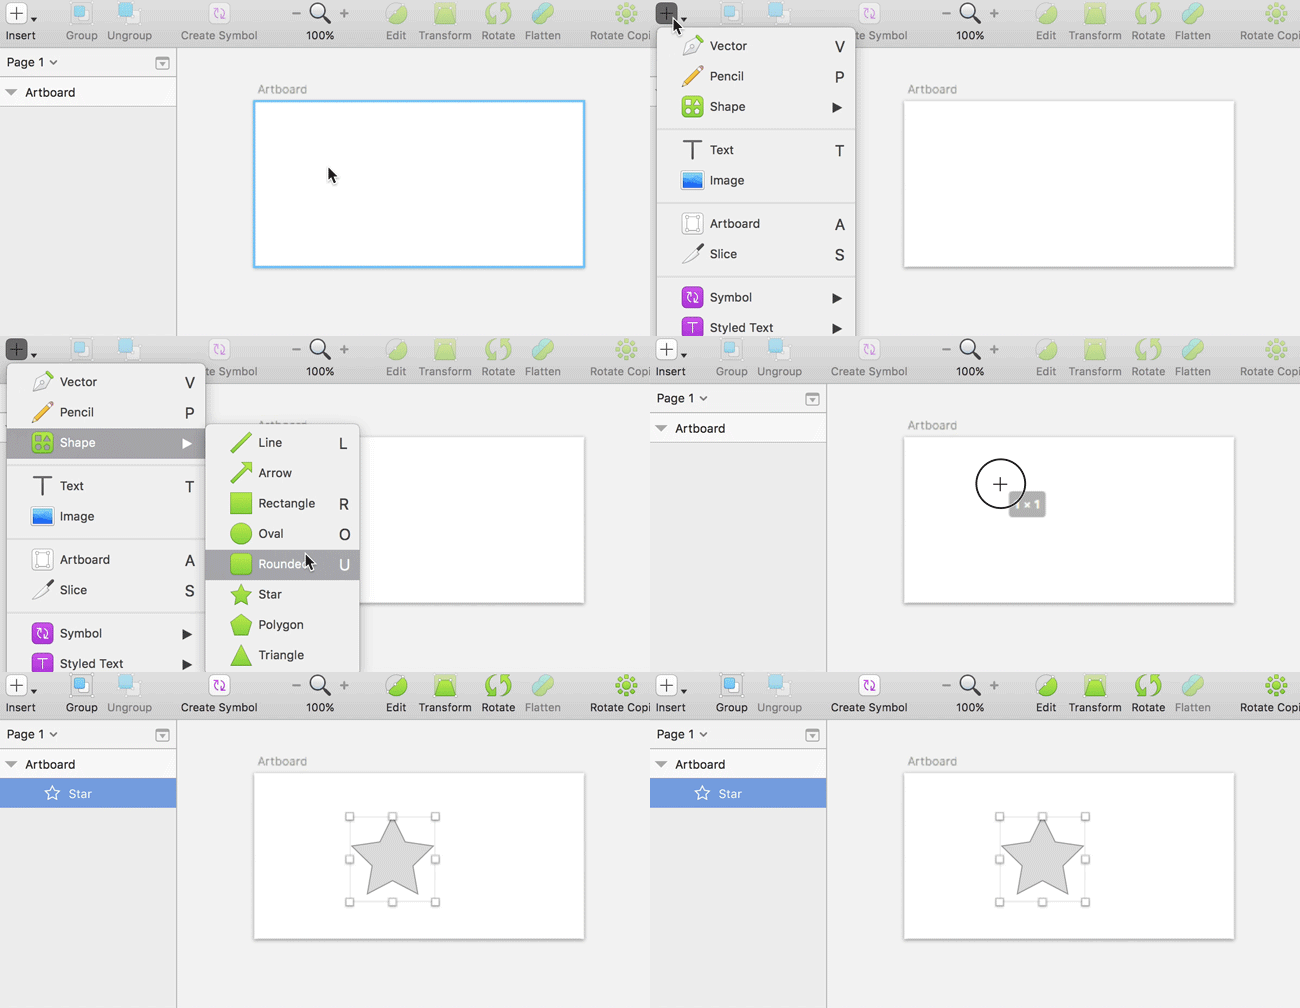
The simplest way to start drawing shapes is to use these simple keyboard shortcuts. (Don’t forget, there’s a cheat sheet of 100+ shortcuts for you to download below!)
- O = Oval
- R = Rectangle
- U = Rounded Rectangle
- L = Line
You can access more preset shapes, like star, polygon, and triangle, by clicking the “Insert” button on the Toolbar. Here I am creating a star:
c. Aligning and distributing objects
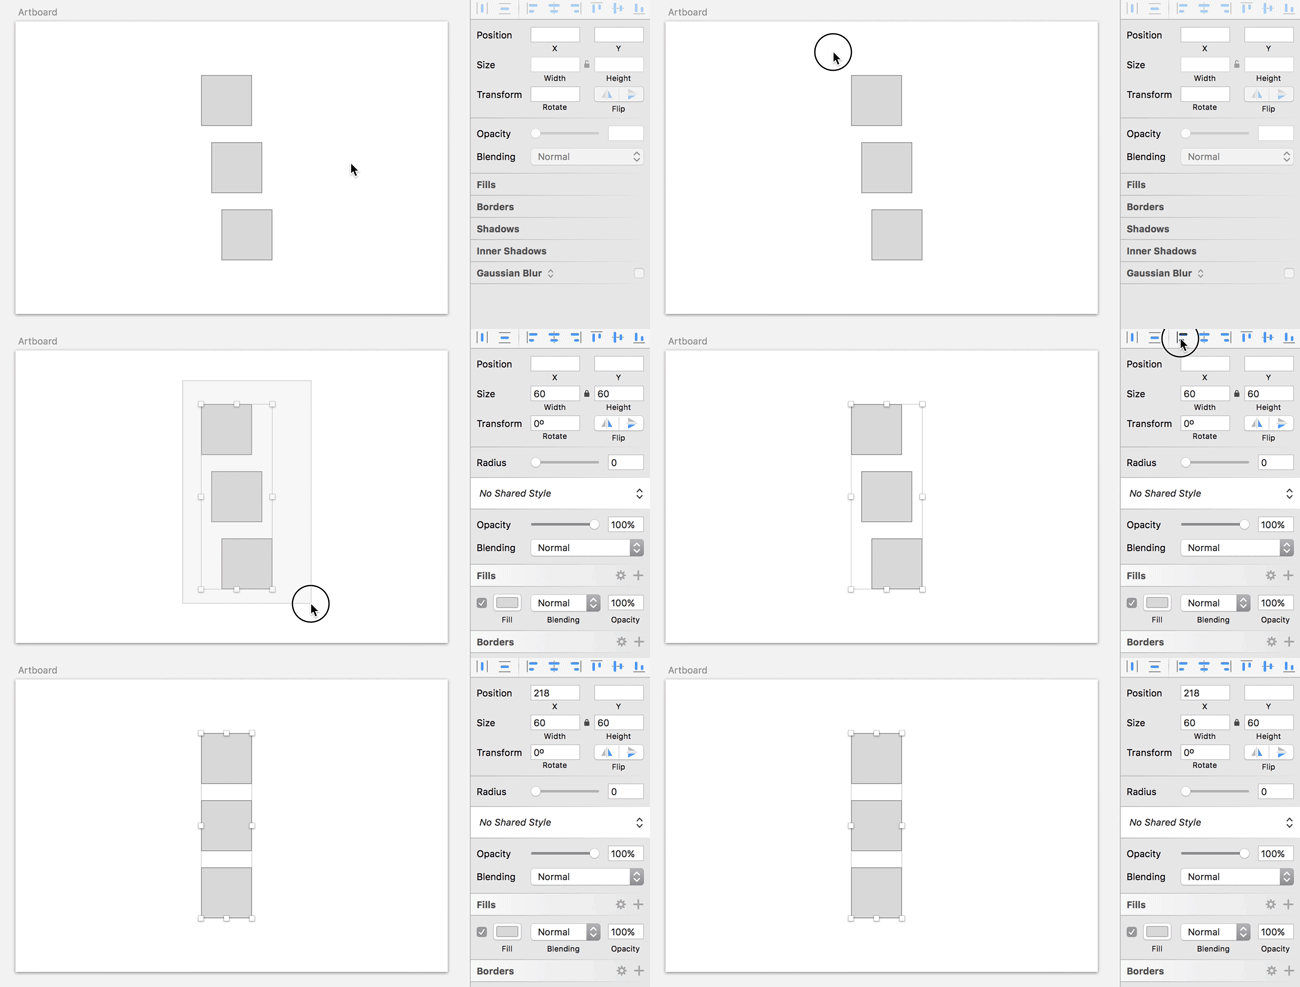
When I first started using Sketch, I fell in love with the alignment and distribution buttons that live at the top of the Inspector panel. Here’s what they do:
These commands have two crucial functions. First, they help you to work efficiently, because you can quickly create a bunch of objects and then line them up and space them out evenly with a couple of clicks. No more desperately trying to drag something to an exact pixel position! And second, they help you to clean up a composition towards the end of the design process, because you can easily ensure that key elements are positioned and spaced consistently, and that everything is sitting where it should be.
Here’s an example of how to use the “Align left” button:
d. Duplicating layers and artboards
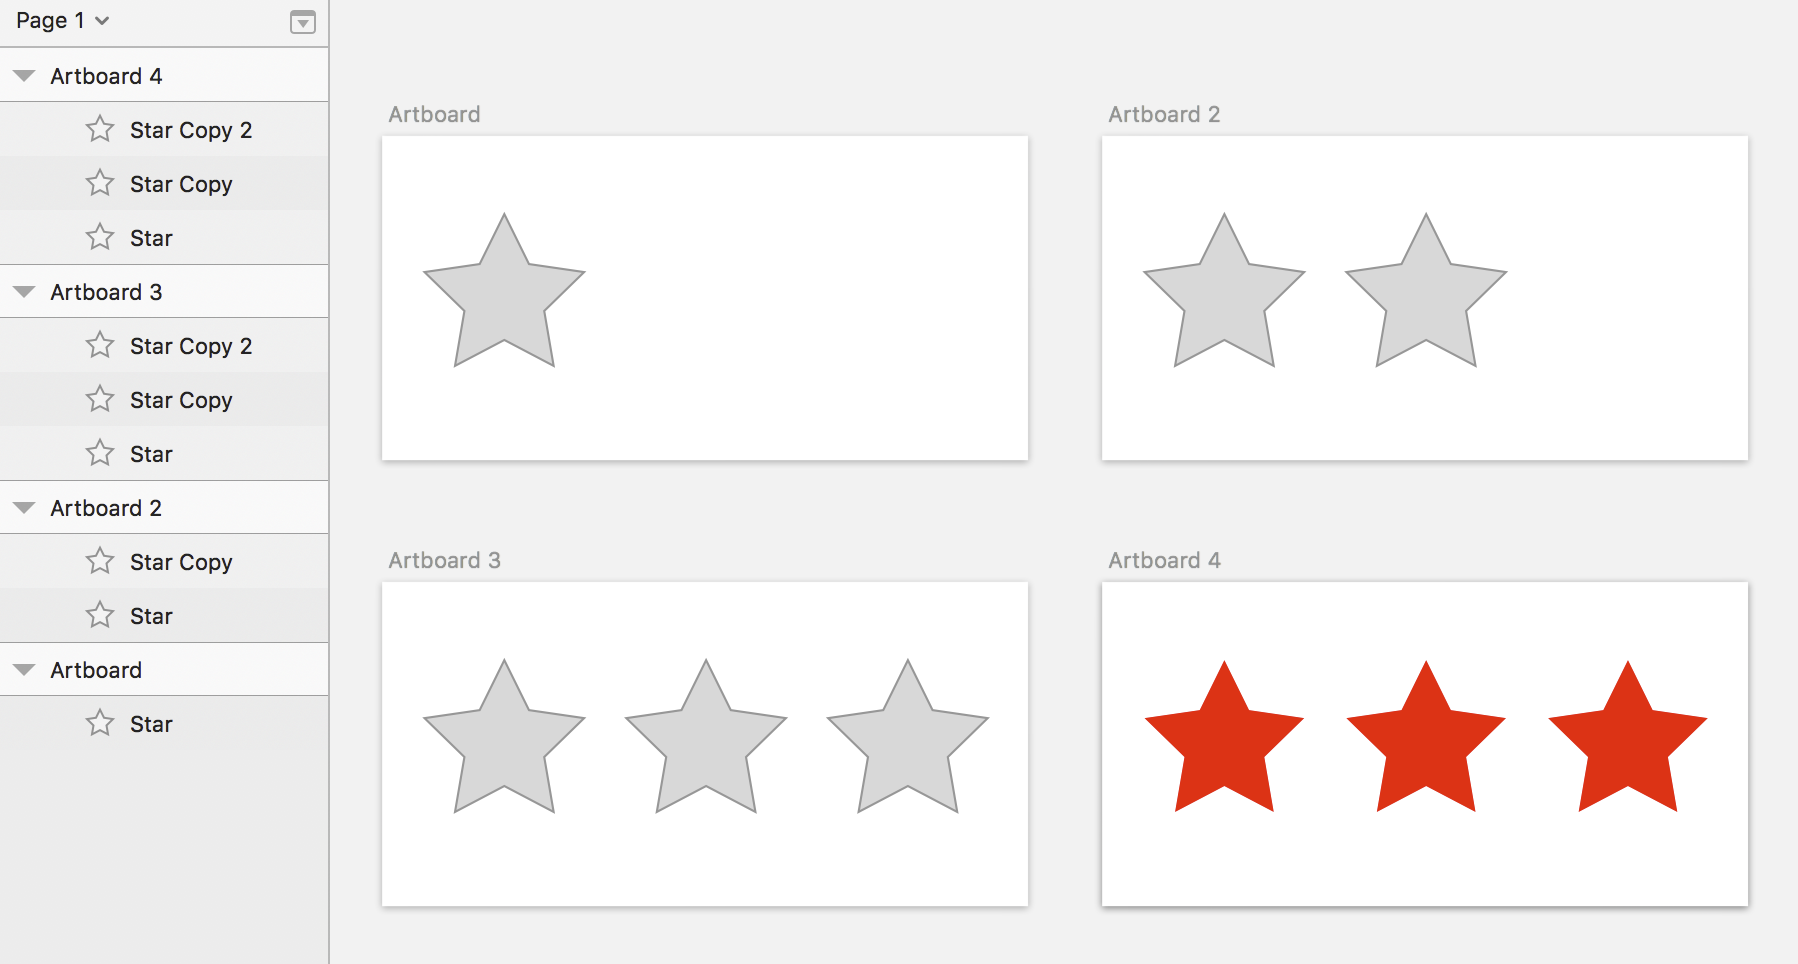
It’s easy to duplicate layers and artboards in Sketch. Right click any object and click “Duplicate” to create another copy on top. Alternatively, just select an object and press command + D, or just hold down alt and then drag the object you want to copy. Here’s me duplicating my little star:
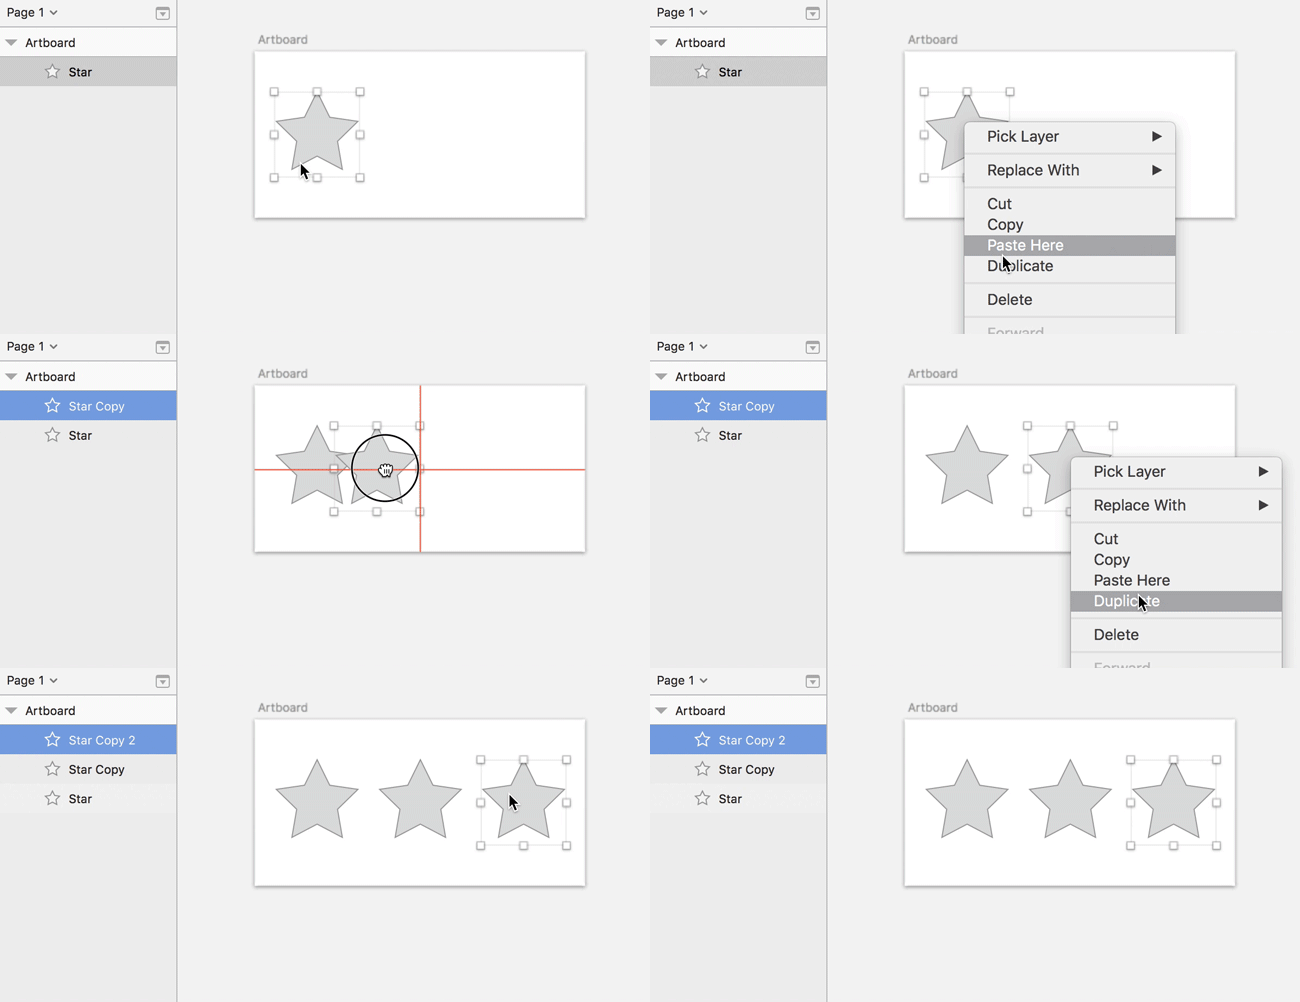
Duplicating artboards is also essential to maintaining an efficient workflow. By duplicating an artboard after each significant change, it’s easy to go back to an earlier version without having to click “Undo” a bajillion times:
e. Read through more top Sketch tips
For more introductory tips like these, check out our series of Sketch Tips to Enhance Your Productivity, which cover the following topics:
- Part 1 - Getting Started In Sketch
- Resize shapes using keyboard shortcuts
- Duplicate an element
- Smart selection
- Grouping and ungrouping elements
- Direct selection within groups
- Set zoom to 100%
- Show all artboards
- Show selected element
- Bring shapes to front or back
- Rename a layer
- Part 2 - Editing and Exporting In Sketch
- Measure distance between elements
- Set opacity using number keys
- Individually change corner radius
- Set up custom shortcuts
- Use math operations inside input fields
- Complex shapes
- Rotate copies command
- Slice command
- Making elements and artboards exportable
- Exporting assets for retina screens
- Part 3 - Composition, Light and Shadow
- Positioning objects “over the edge”
- Combine light and dark to create depth
- Mimic folded surfaces
- Spotlights to create hard shadows
- Diffuse lights to create soft shadows
- Distance between an object and its shadow
- Multiple light sources
- Horizon line
- Overlapping objects
And finally… work through these Sketch tutorials
Level Up Tutorials have a great series of 5-10 minute Sketch video tutorials. When I first started learning Sketch I worked through all of them, taking notes along the way, or pausing the video to try things out. It boosted my confidence, and also enabled me to work more quickly than if I’d tried to learn everything without help.
- Introduction
- Introduction to Sketch
- Getting around Sketch
- Workflow
- Understanding Artboards
- Pages
- Layout
- Grids & Layout
- Alignment & Distribution
- Shapes & Styles
- Styling Shapes
- Text Styles
- Shapes
- Extra tricks
- 5 tips and shortcuts
- Symbols
For even more tips and tutorials to help you get started in Sketch, see the “Further Resources” section towards the end of this article.
3. More advanced techniques in Sketch
Once you’re up to speed on the basics, it’s time to explore some of the more advanced features available to you as a Sketch user!
Master the Bézier curve

As I mentioned earlier, Sketch is a vector graphics editor, which means that all objects in Sketch are made up of points and curves. To get the most value from Sketch, you need to master how to control and manipulate those points and curves. Doing so will also enable you to draw your own complex shapes, like letterforms, from scratch.
Peter Nowell has written an awesome article about how to master the Bézier curve. He sets out some important common sense workflow principles, explains the difference between straight, mirrored, asymmetric, and disconnected handles, and offers practical tips for how to work with the vector tool in Sketch. Go check it out!
Create Symbols
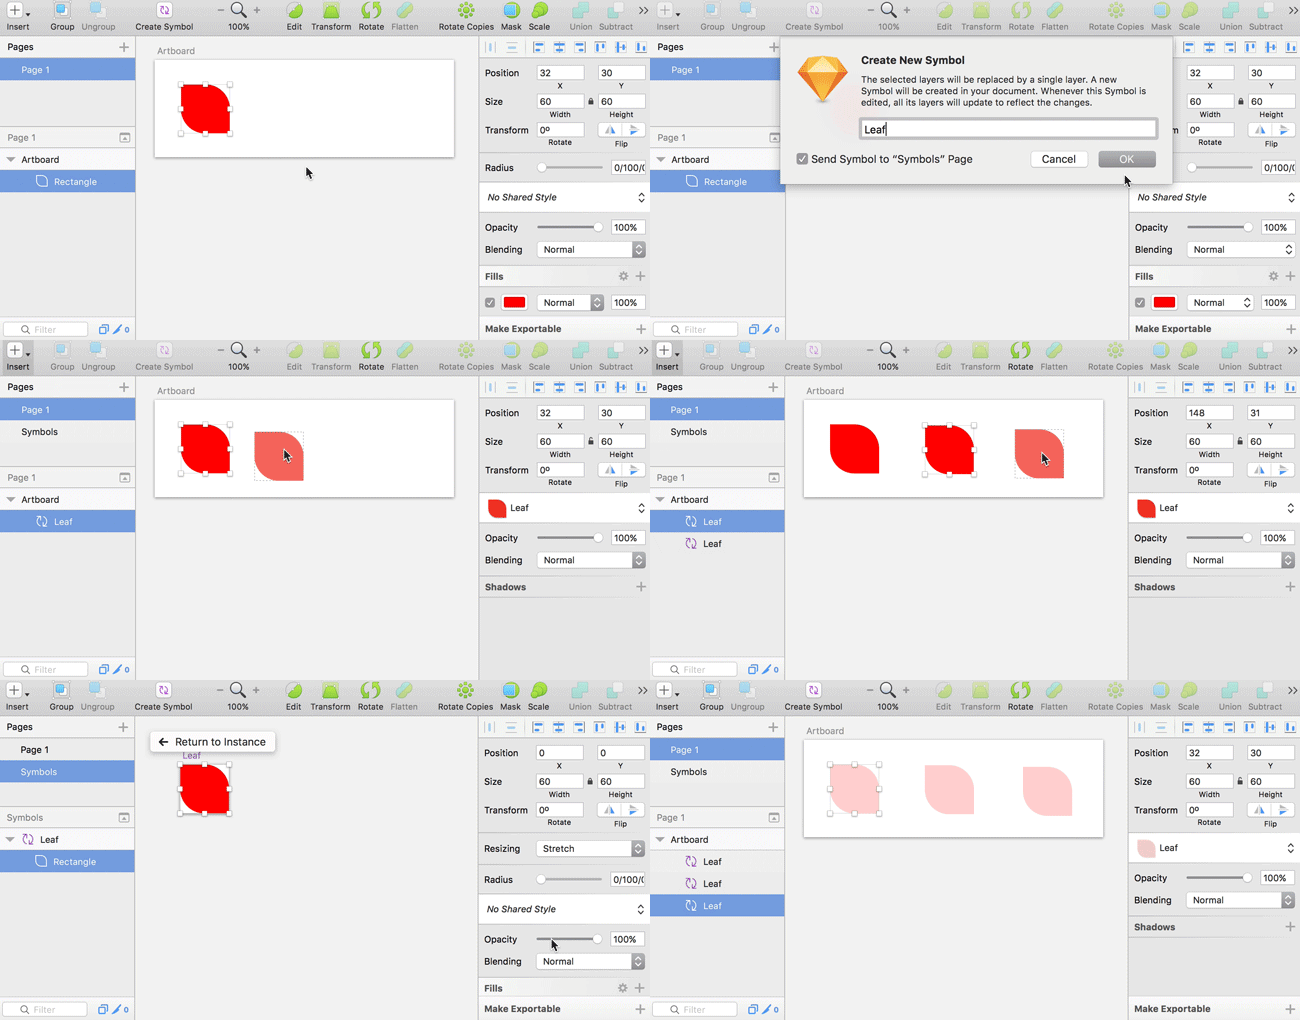
Sketch allows you to create your own “symbols”. This means that you can save a layer or a group as a symbol that you can then insert into your document as if it was an ordinary shape.
What makes symbols special is that you can double click an “instance” of a symbol, make a change to the “master” symbol, and all instances of that symbol in your document will be updated to match. Here’s a GIF of me creating a leaf-shaped symbol, inserting 2 more instances of it, and then changing the opacity of the master symbol. Notice how the others get updated too:
Advanced resizing options
When you’re working with grouped objects, you might want objects within the group to behave differently when resized. For each object inside a group, Sketch allows you to choose which resizing method it should use.
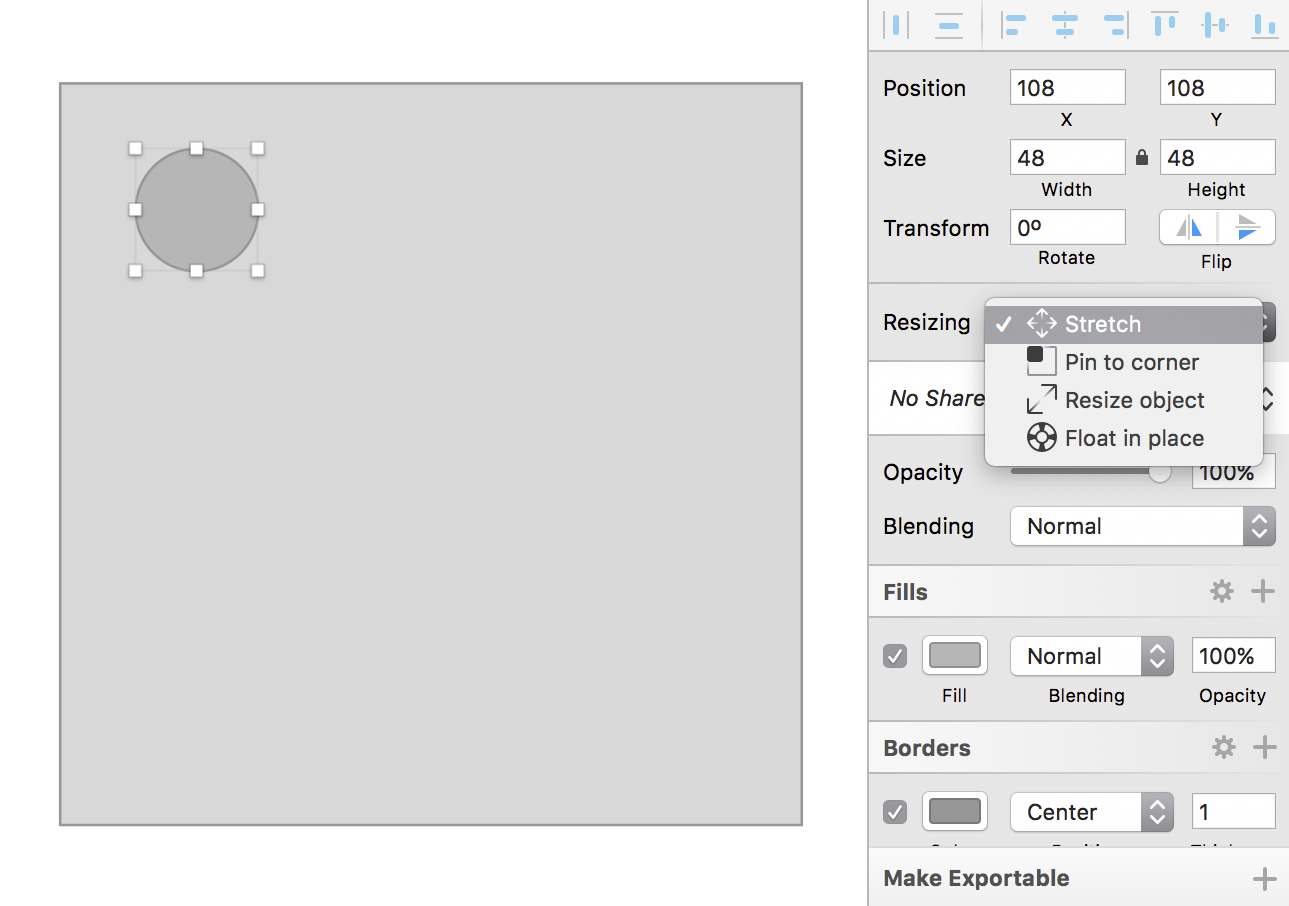
Here are the options:
- Stretch: the object will be resized in proportion to the overall dimensions of the group. This is the default, and what you would usually expect to happen when resizing.
- Pin to corner: the object will be resized, but its position won’t change (relative to the nearest corner).
- Resize object: the object will be resized by the same pixel value as the group is resized. If the group becomes 50 pixels wider, the object also become 50 pixels wider.
- Float in place: the object will not be resized when the group is resized, but it will change position in proportion to the overall dimensions of the group.
See here for more about group and symbol resizing.
Learn about blending modes

A blending mode is a setting that determines how the colors of one layer interact with the layers underneath it. Sketch currently offers 15 different blending modes. If you’re a Photoshop user, you’ll probably be familiar with some of these already. For an explanation of what each one does, and how to create awesome effects using blending modes alone, read this nicely illustrated article by Mauricio Uehara.
Use Sketch for Print Design!

Especially for those who find they work more quickly and productively in Sketch, it can make sense to prepare print documents there rather than in a print-specific package like Adobe InDesign. In another awesome article, Peter Nowell explains how to use Illustrator to prepare a PDF that was made in Sketch for print.
Try out your skills with some mini-projects
You’ve read this far, so why not try out your new skills by attempting to reproduce a couple of mini-projects in Sketch? Start with an easy one by recreating the Google Docs icon. Then try something more advanced—my favorites are this simple illustration of a prescription bottle and a Dribbble-inspired ice cream.
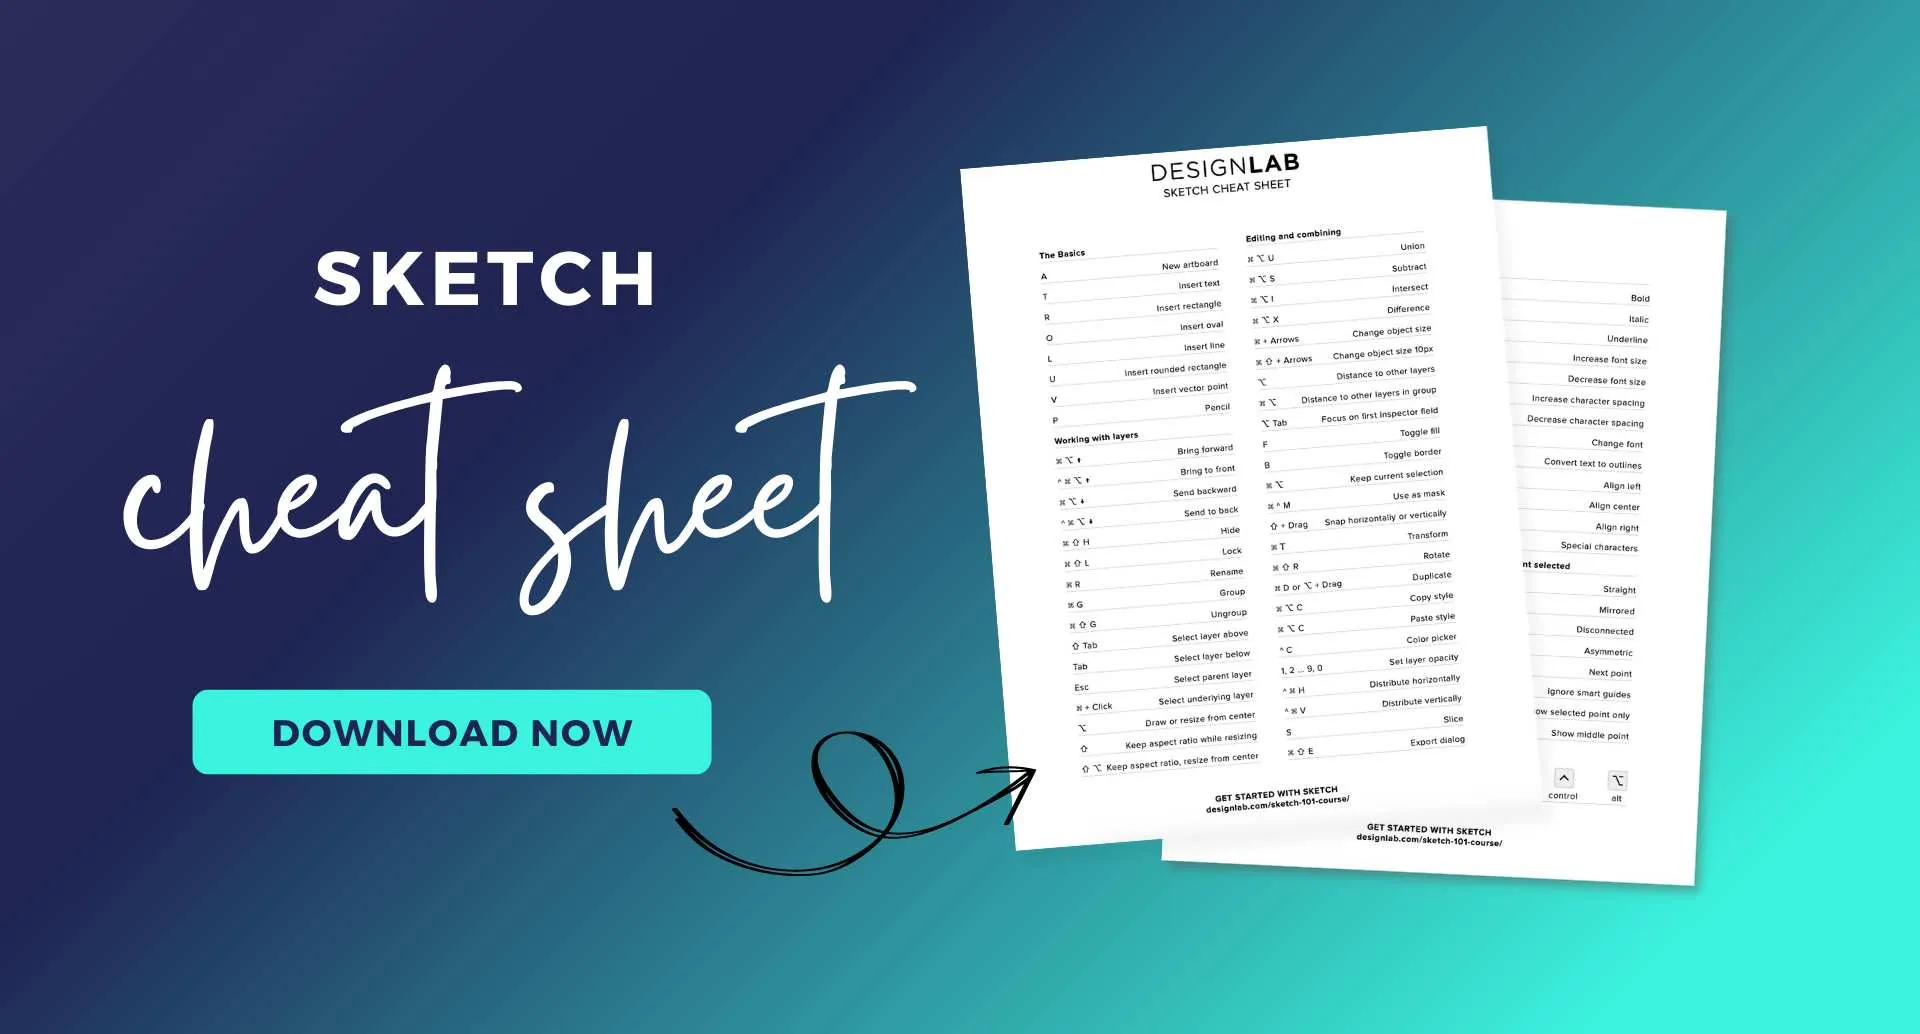
Download Your Free 99 Point Cheat Sheet
As a Designlab student, you can get 50% off a Sketch license. Designlab is not a paid promoter of Sketch, and we don’t receive anything when you purchase a license. We recommend it because we genuinely believe it is a great UX design tool.
Are you ready to take your Sketch skills to the next level and use them to pursue a career in UX/UI design? Check out our UX Academy bootcamp, where you'll work 1:1 with an expert design mentor, receive feedback on a portfolio of UX projects through a dedicated online platform, community critique sessions, and video calls. Find out more!


.svg)


